Table Of Contents
Pre-requisites
-
SSH into every node in the cluster.
-
Stop elasticsearch service in each of the nodes:
$ sudo service elasticsearch stop
- (Optional) Switch to root user in each of the nodes for elevated privileges (or) use sudo prefix for all commands in this guide:
$ sudo su -
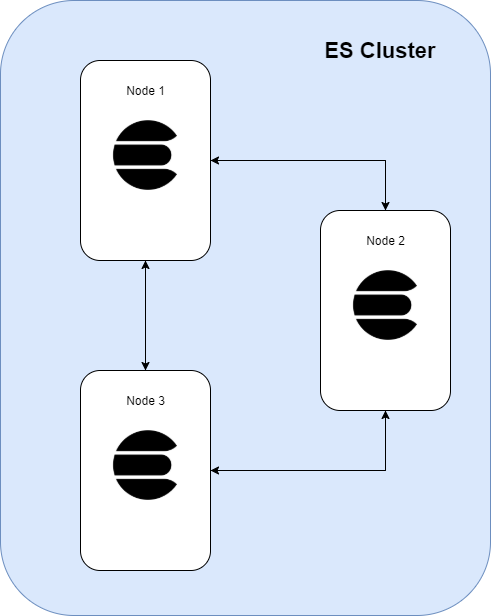
Secure Communications Inside An ElasticSearch Cluster
Transport protocol is used for internal communications between Elasticsearch nodes.
This communication by default is not encrypted, so all the data is sent in plain text. Also, the nodes joining your cluster are not validated.
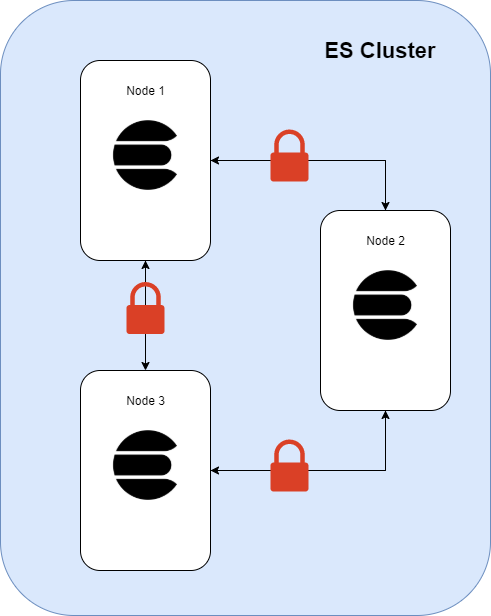
Elastic Stack security features enable you to encrypt traffic to, from, and within your Elasticsearch cluster. Connections are secured using Transport Layer Security (TLS/SSL).
Let’s see the steps involved in securing your cluster with TLS to perform encryption and authentication of nodes joining your cluster.
Create Certificate Authority
TLS requires X.509 certificates to perform encryption and authentication of the application that is being communicated with.
In order for the communication between nodes to be truly secure, these certificates must be validated.
The recommended approach for validating certificate authenticity in an Elasticsearch cluster is to trust the certificate authority (CA) that signed the certificate.
| Term | Description |
|---|---|
| X.509 | X.509 is a standard defining the format of public key certificates. An X.509 certificate contains a public key and an identity (a hostname, or an organization, or an individual), and is either signed by a certificate authority or self-signed. |
| CA | Certificate authority(CA) is an entity that issues digital certificates. A CA acts as a trusted third party—trusted both by the subject (owner) of the certificate and by the party relying upon the certificate. |
There are two formats in which you can generate X.509 certificates, namely, PEM and PKCS12.
| Term | Description |
|---|---|
| PEM | Container format that includes an entire certificate chain including public key, private key, and root certificates. |
| PKCS12 | Passworded container format that contains both public and private certificate pairs. Unlike .pem files, this container is fully encrypted. |
elasticsearch-certutil takes care of generating a CA and signing certificates with the CA.
In any one of your nodes in the cluster, run below commands to generate the X.509 certificate for your CA in any of the supported formats.
# go to elasticsearch installation
$ cd /usr/share/elasticsearch/

# generate certificate in PEM format
# output will be a zip file containing individual files for the CA certificate and private key, with a default name of elastic-stack-ca.zip
$ ./bin/elasticsearch-certutil ca --pem

# generate certificate in PKCS12 format
# outputs a single file, with a default name of elastic-stack-ca.p12
# elasticsearch-certutil command also prompts you for a password to protect the file and key
$ ./bin/elasticsearch-certutil ca
Note: If you plan to add more nodes to your cluster in the future, retain a copy of the file and remember its password (if you provided one).
If you had generated the certificate in PEM format, unzip the files.
$ unzip elastic-stack-ca.zip
You can use OpenSSL to view the certificate output like expiration date, common name, issuer.
$ openssl x509 -text -noout -in ca/ca.crt

Certificate:
    Data:
        Version: 3 (0x2)
    Signature Algorithm: sha256WithRSAEncryption
        Issuer: CN=Elastic Certificate Tool Autogenerated CA
        Validity
            Not Before: May  1 11:36:02 2020 GMT
            Not After : May  1 11:36:02 2023 GMT
        Subject: CN=Elastic Certificate Tool Autogenerated CA
    Signature Algorithm: sha256WithRSAEncryption
If you had generated the certificate in PKCS12 format, you can view the certificate output like expiration date, common name, issuer by running below command (You will prompted for the password which you had provided earlier for generating the certificate).
$ openssl pkcs12 -info -in elastic-stack-ca.p12

Enter Import Password:
MAC Iteration 100000
MAC verified OK
PKCS7 Data
Enter PEM pass phrase:
Verifying - Enter PEM pass phrase:
-----BEGIN ENCRYPTED PRIVATE KEY-----
-----END ENCRYPTED PRIVATE KEY-----

subject=/CN=Elastic Certificate Tool Autogenerated CA
issuer=/CN=Elastic Certificate Tool Autogenerated CA
-----BEGIN CERTIFICATE-----
-----END CERTIFICATE-----
Generate Node Certificates
Now, we can generate certificates for each of the nodes in our cluster using the CA authority which we had created earlier.
We will use the CA to sign the individual certificates. By doing this, as nodes are added to your cluster they just need to use a certificate signed by the same CA and the node is automatically allowed to join the cluster.
You can generate the node certificates by using the cert option and providing the CA X.509 certificate path as shown below:
# if you had generated the CA certificate in PEM format
$ ./bin/elasticsearch-certutil cert --ca-cert ca/ca.crt --ca-key ca/ca.key --multiple

# if you had generated the CA certificate in PKCS12 format
$ ./bin/elasticsearch-certutil cert --ca elastic-stack-ca.p12 --multiple
Notice that we are using –multiple option here. It allows us to generate certificates for multiple nodes in interactive mode.
You will be asked for the Instance, file name, IP address and DNS names for each of the nodes.
By default elasticsearch-certutil generates certificates that have no hostname information in them (that is, they do not have any Subject Alternative Name fields). This means that you can use the certificate for every node in your cluster without hostname verification.
It is recommended that the certificates contain subject alternative names (SAN) that correspond to the node’s IP address and DNS name so that hostname verification can be performed.
So, in the interactive mode, specify details such as EC2 instance ID for instance name, accept default filename, private IP of your EC2 instance for IP Address and private DNS name for DNS name entry (if your ES cluster is in private subnet otherwise use public IP/DNS) for all of your nodes in the cluster.
Enter instance name: i-04xxxxxxxxxx
Enter name for directories and files of i-04xxxxxxxxxx [i-04xxxxxxxxxx]:
Enter IP Addresses for instance (comma-separated if more than one) []: 10.0.0.0
Enter DNS names for instance (comma-separated if more than one) []: ip-10-0-0-0.ec2.internal
Would you like to specify another instance? Press 'y' to continue entering instance information: y
Enter instance name: i-0fxxxxxxxxx
Enter name for directories and files of i-0fxxxxxxxxx [i-0fxxxxxxxxx]:
Enter IP Addresses for instance (comma-separated if more than one) []: 10.0.0.1
Enter DNS names for instance (comma-separated if more than one) []: ip-10-0-0-1.ec2.internal
Would you like to specify another instance? Press 'y' to continue entering instance information: y
Once you add all your node details, a /usr/share/elasticsearch/certificate-bundle.zip file will get created.
There will be a directory for each instance. Each instance has a single PKCS#12 (.p12) file containing the instance certificate, instance private key and the CA certificate.
Unzip the bundle so that you can view the certificate content.
-rw-------  1 root root  11576 May  1 13:20 certificate-bundle.zip
drwxr-xr-x  2 root root     37 May  1 13:20 i-04xxxxxxxxxx
drwxr-xr-x  2 root root      6 May  1 13:21 i-0fxxxxxxxxx
You can use OpenSSL to view the contents of .p12 cert file (You may need to provide the password for decrypting the file).
openssl pkcs12 -in i-04xxxxxxxxxx/i-04xxxxxxxxxx.p12 -clcerts -nokeys
Enter Import Password:
MAC verified OK
Bag Attributes
    friendlyName: i-04xxxxxxxxxx
subject=/CN=i-04xxxxxxxxxx
issuer=/CN=Elastic Certificate Tool Autogenerated CA
-----BEGIN CERTIFICATE-----

-----END CERTIFICATE-----
Notice that the friendlyName and subject contains the instance name which you had provided earlier. The content between the begin and end certificate is block of encoded text that contains all of the certificate information and public key.
For example, the encoded text will contain below content:
Common Name: i-04xxxxxxxxxx
Subject Alternative Names: IP Address:10.0.0.0, ip-10-0-0-0.ec2.internal
Valid From: May 1, 2020
Valid To: May 1, 2023
Serial Number: 06511ef7046baa25bec706
So, when a node wants to join a cluster it needs to have a valid certificate generated by the trusted CA and the server’s hostname (or IP address) must match the names identified within the certificate.
Alternate Approach 1:
Instead of the –multiple option which you had used earlier, you can generate the individual node certificates separately using below command:
$ ./bin/elasticsearch-certutil cert --ca-cert ca/ca.crt --ca-key ca/ca.key --ip 10.0.0.0 --dns ip-10-0-0-0.ec2.internal --name i-04xxxxxxxxxx
Alternate Approach 2:
If you don’t need host name verification i.e. certificates won’t have subject alternative names (SAN) and they can be used by any node that wants to join the cluster, as long as the node has a valid certificate signed by trusted CA.
# don't specify ip, dns or name options
$ ./bin/elasticsearch-certutil cert --ca-cert ca/ca.crt --ca-key ca/ca.key
Transfer Node Certificates
Remember, that we were performing the previous steps for generating certificates in one of the nodes in the cluster.
Now, we need to transfer the certificates to the other nodes so that they can use them.
We don’t need to transfer all the certificates to every other node. Transfer only the respective node certificates identified by the instance name. Make sure that you transfer the correct files otherwise hostname verification would fail and the node would not be able to join the cluster.
We will use scp to transfer the files. Run below command replacing the IP and .p12 file name for each node.
# provide private_key_file for authentication if you had configured key pair for your nodes. Make sure to update your cluster security group to allow access to port 22.
# e.g. scp -i i-04xxxxxxxxxx.pem i-04xxxxxxxxxx/i-04xxxxxxxxxx.p12 ec2-user@10.0.0.0:/home/ec2-user
$ scp -i <private_key_file> <p12_file_path> ec2-user@<instance_ip>:/home/ec2-user
Once you transferred the files, log in to each of the nodes and move the certificate to config directory (you will need root permissions).
# run command in /home/ec2-user directory
$ mv i-04xxxxxxxxxx.p12 /etc/elasticsearch/
Update Keystore And Truststore
In each of the nodes, run below command and provide the password for the file which you had configured earlier.
$ cd /usr/share/elasticsearch

# add password to keystore
$ ./bin/elasticsearch-keystore add xpack.security.transport.ssl.keystore.secure_password

# add password to truststore
$ ./bin/elasticsearch-keystore add xpack.security.transport.ssl.truststore.secure_password
Keystore is used to store private key and identity certificates that a specific program should present to both parties (server or client) for verification.
Truststore is used to store certificates from Certified Authorities (CA) that verify the certificate presented by the server in SSL connection.
Here, we are only configuring the password for the certificate. We will be configuring the certificate to be used in elasticsearch.yml file.
Enable TLS
In order to enable TLS, we had performed below:
-
Created a new CA since CA serves as a trusted third party.
-
Created certificates with Subject Alternative Names (SAN) for each of the nodes in our cluster signed by the CA.
-
Placed the certificates in the respective node’s config directory.
-
Updated the keystore and truststore with password required to decrypt the certificates.
Now it’s time to enable TLS so that if a node wants to join a cluster it needs to provide the certificate which will be validated for two things -
-
Certificate is signed by the same trusted CA
-
IP address of the node matches the SAN in the certificate
In each of the node’s /etc/elasticsearch/elasticsearch.yml file add below content to enable TLS (update p12 file name with the node’s certificate name e.g. i-04xxxxxxxxxx.p12):
xpack.security.transport.ssl.enabled: true
# if you don't need hostname verification then set verification_mode as certificate
xpack.security.transport.ssl.verification_mode: full
xpack.security.transport.ssl.keystore.path: <p12_file_name>
xpack.security.transport.ssl.truststore.path: <p12_file_name>
# for logging in development
logger.org.elasticsearch.xpack.core.ssl: TRACE
Note: i-04xxxxxxxxxx.p12 needs to be in the config directory as elasticsearch will be looking for the file in that directory and use the password in the keystore to decrypt the content.
In each of the nodes, start the elasticsearch service to apply the changes:
$ sudo service elasticsearch start
Check the logs in /var/log/[cluster_name].log and you should notice something like below:
[2020-05-01T13:54:29,493][DEBUG][o.e.x.c.s.SSLService ] [ip-10-246-39-155.ec2.internal] using ssl settings [SSLConfiguration{keyConfig=[keyStorePath=[i-04xxxxxxxxxx.p12], keyStoreType=[PKCS12], keyStoreAlgorithm=[SunX509], trustStoreAlgorithm=[PKIX]], trustConfig=trustStorePath=[i-04xxxxxxxxxx.p12], trustStoreAlgorithm=[PKIX]], cipherSuites=[[TLS_ECDHE_RSA_WITH_AES_256_CBC_SHA384, TLS_ECDHE_ECDSA_WITH_AES_256_CBC_SHA384, TLS_ECDHE_ECDSA_WITH_AES_256_CBC_SHA, TLS_ECDHE_RSA_WITH_AES_256_CBC_SHA, TLS_RSA_WITH_AES_256_CBC_SHA256, TLS_RSA_WITH_AES_256_CBC_SHA, TLS_ECDHE_RSA_WITH_AES_128_CBC_SHA256, TLS_ECDHE_ECDSA_WITH_AES_128_CBC_SHA256, TLS_ECDHE_ECDSA_WITH_AES_128_CBC_SHA, TLS_ECDHE_RSA_WITH_AES_128_CBC_SHA, TLS_RSA_WITH_AES_128_CBC_SHA256, TLS_RSA_WITH_AES_128_CBC_SHA]], supportedProtocols=[[TLSv1.3, TLSv1.2, TLSv1.1]], sslClientAuth=[REQUIRED], verificationMode=[CERTIFICATE]}]
You can see that the node has picked up it’s certificate, config and TLS protocols to communicate with other nodes in the cluster.
It will now do a TLS handshake and once successful, it will join other authenticated nodes to form a cluster.
Communication between the nodes is now fully encrypted.
References
https://www.elastic.co/guide/en/elasticsearch/reference/current/configuring-tls.html
https://www.elastic.co/guide/en/elasticsearch/reference/current/security-settings.html
https://www.elastic.co/guide/en/elasticsearch/reference/current/encrypting-communications-hosts.html
https://www.elastic.co/guide/en/elasticsearch/reference/current/ssl-tls.html
https://www.elastic.co/blog/elasticsearch-security-configure-tls-ssl-pki-authentication