Table Of Contents
Introduction
Locust is an easy-to-use, distributed, user load testing tool. It is intended for load-testing web sites (or other systems) and figuring out how many concurrent users a system can handle.
Even though Locust is web-oriented, it can be used to test almost any system.
Installation
Locust requires Python 3 and above.
Install the Dev libraries required for locust:
# Install gcc (for CentOS, RHEL)
sudo yum groupinstall "Development Tools"

# Install gcc (for Debian base)
sudo apt-get install build-essential

# Install header files and static libraries for python dev (for CentOS, RHEL)
sudo yum install python3-devel

# Install header files and static libraries for python dev (for Ubuntu)
sudo apt-get install python3-dev
Now we can install Locust using below command:
pip3 install locust --user
Locustfile
To work with Locus, we need to define a locustfile which is a normal python file.
If you name the file as anything other than locustfile.py then you need pass the file name when you start locust.
The only requirement is that it declares at least one class— let’s call it the locust class—that inherits from the class Locust.
A locust class represents one user (or a swarming locust if you will). Locust will spawn (hatch) one instance of the locust class for each user that is being simulated.
FastHttpLocust
Let’s say, we want to load test OpenWeather API, having sample endpoint api.openweathermap.org/data/2.5/weather?q={cityName},{state}&appid={apiKey}
Here, we will be making an HTTP request, so we need to make use of FastHttpLocust which uses geventhttpclient to send HTTP requests.
locustfile.py
from locust.contrib.fasthttp import FastHttpLocust

class MyLocust(FastHttpLocust):
Attributes
There are a few attributes that a locust class should typically define.
task_set attribute - should point to a TaskSet class which defines the behaviour of the user
wait_time attribute - how long a simulated user will wait between executing tasks
from locust.contrib.fasthttp import FastHttpLocust

class MyLocust(FastHttpLocust):
    task_set = # TaskSet class
    wait_time = # Wait Time
Wait Time
There are few built-in functions to define wait time such as between, constant and constant_pacing.
Since we will be hitting a REST endpoint we don’t need any wait time to simulate user behavior. So, we can make use constant built in function.
from locust import constant
from locust.contrib.fasthttp import FastHttpLocust

class MyLocust(FastHttpLocust):
    task_set = # TaskSet class
    wait_time = constant(0)
TaskSet
If the Locust class represents a swarming locust, you could say that the TaskSet class represents the brain of the locust.
A TaskSet is, like its name suggests, a collection of tasks.
When a load test is started, each instance of the spawned Locust classes will start executing their TaskSet. What happens then is that each TaskSet will pick one of its tasks and call it.
So, in a TaskSet we can define multiple tasks to hit various endpoints.
from locust import TaskSet, constant
from locust.contrib.fasthttp import FastHttpLocust

class MyTaskSet(TaskSet):

class MyLocust(FastHttpLocust):
    task_set = MyTaskSet
    wait_time = constant(0)
Tasks
The typical way of declaring tasks for a TaskSet it to use the task decorator.
When inheriting from the FastHttpLocust class, we can use its client attribute to make HTTP requests against the server.
So, we pass the API path to the client for making the request. We will be specifying the host name later when we are launching the locust.
from locust import TaskSet, task, constant
from locust.contrib.fasthttp import FastHttpLocust

class MyTaskSet(TaskSet):
    api_path = "/data/2.5/weather?q={},{}&appid={}"

    @task
    def api_call(self):
        response = self.client.get(self.api_path)

class MyLocust(FastHttpLocust):
    task_set = MyTaskSet
    wait_time = constant(0)
CSV Input
For our scenario, we want to load test the API by sending a collection of request samples.
We could have the data for cityName, state in a csv file and pass it to the client.
Let’s create another file csvreader.py which will have the functionality to read csv data.
import csv

class CSVReader:
    def __init__(self, file):
        try:
            file = open(file)
        except TypeError:
            pass
        self.file = file
        self.reader = csv.reader(file)

    def __next__(self):
        try:
            return next(self.reader)
        except StopIteration:
            self.file.seek(0, 0)
            return next(self.reader)
Let’s update our locustfile to iterate the csv data and construct the API path for making the requests within the task.
from locust import TaskSet, task, constant
from locust.contrib.fasthttp import FastHttpLocust
from csvreader import CSVReader

reader = CSVReader("/home/ec2-user/uscities.csv")

class MyTaskSet(TaskSet):
    api_path = "/data/2.5/weather?q={},{}&appid={}"

    @task
    def api_call(self):
        data = next(reader)
        response = self.client.get(self.api_path.format(data[0], data[1]))

class MyLocust(FastHttpLocust):
    task_set = MyTaskSet
    wait_time = constant(0)
Environment Variables
Locust doesn’t have provision to send custom arguments to your TaskSet.
You have to set it as an environment variable and access in your TaskSet.
Our OpenWeather API requires an API key to be passed for every request. Let’s access it via environment variables.
import os
from locust import TaskSet, task, constant
from locust.contrib.fasthttp import FastHttpLocust
from csvreader import CSVReader

reader = CSVReader("/home/ec2-user/uscities.csv")

class MyTaskSet(TaskSet):
    api_path = "/data/2.5/weather?q={},{}&appid={}"

    @task
    def api_call(self):
        data = next(reader)
        response = self.client.get(self.api_path.format(data[0], data[1], os.environ.get("API_KEY")))

class MyLocust(FastHttpLocust):
    task_set = MyTaskSet
    wait_time = constant(0)
Now that we have the code, let’s see how to run locust.
Running Locust
It’s important to note that each instance of locust uses only one CPU core.
So, when you are ready to run the load test, it’s recommended to run it in distributed mode.
Locust in distributed mode has master and slaves. Master node doesn’t simulate any users and just manages the Web UI.
Let’s say your machine has 4 CPU cores, then we need to run one slave instance per processor core in the machine.
First, start the master node by running below command in the same location you have your locustfile:
env API_TOKEN=<apiKey> locust --master
Note: We are passing the API token as an environment variable when we start the locust node.
Next, start up a number of slaves based on the cores in your machine:
locust --slave &
locust --slave &
locust --slave &
locust --slave &
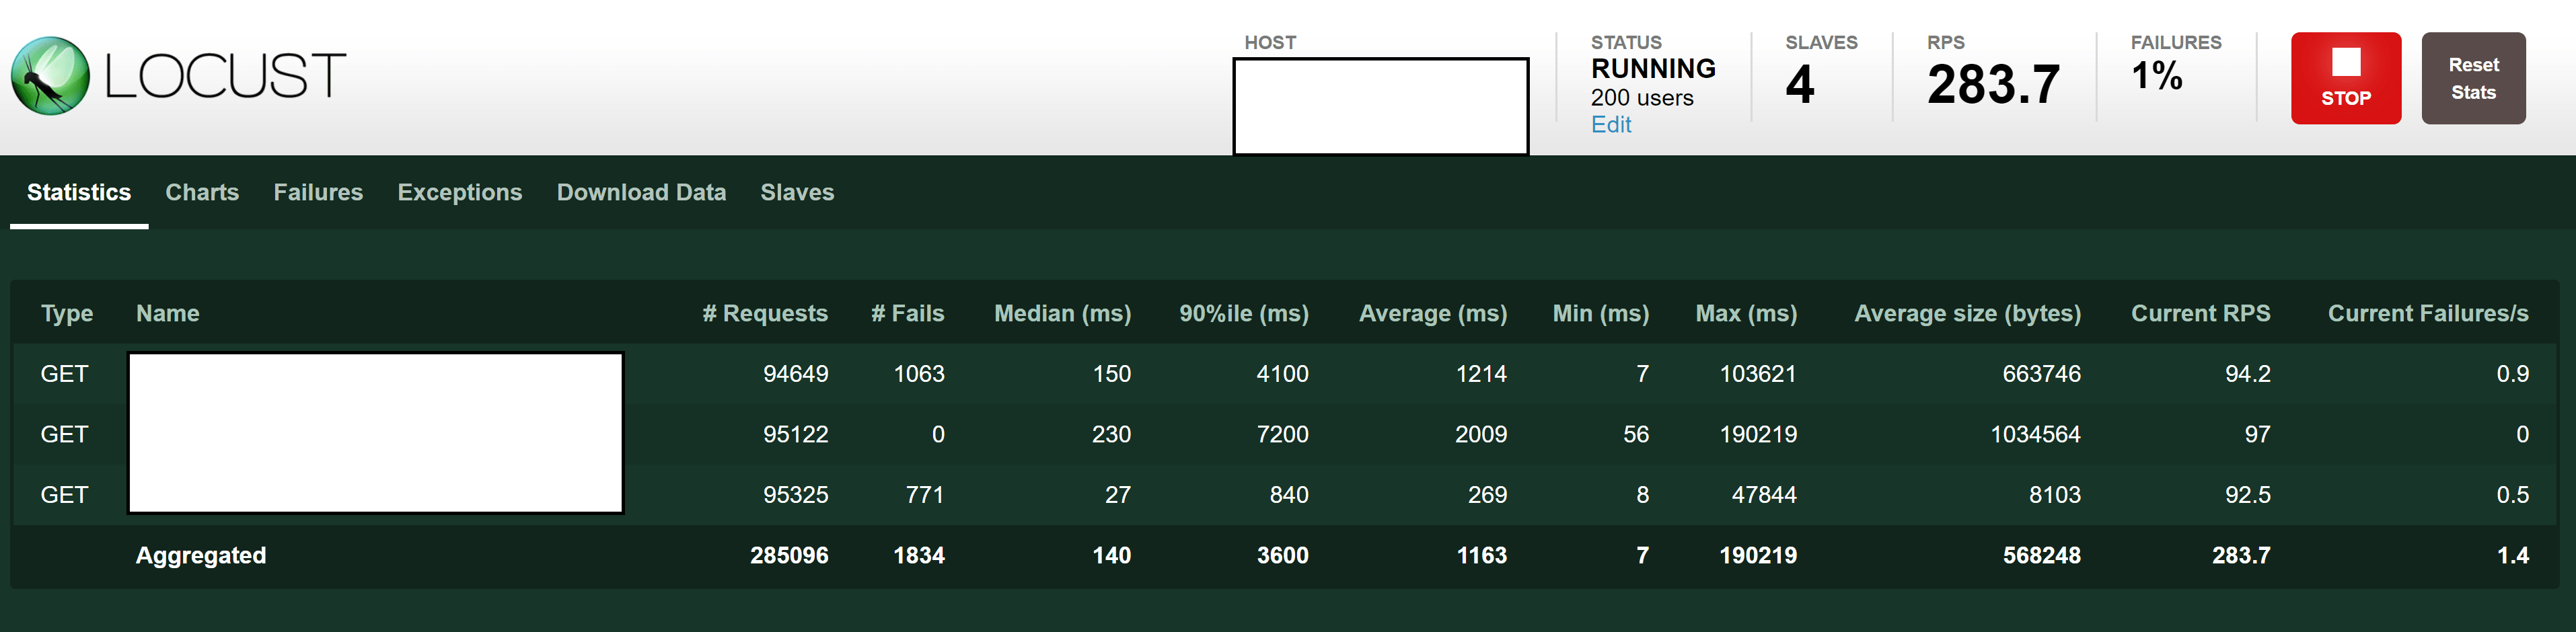
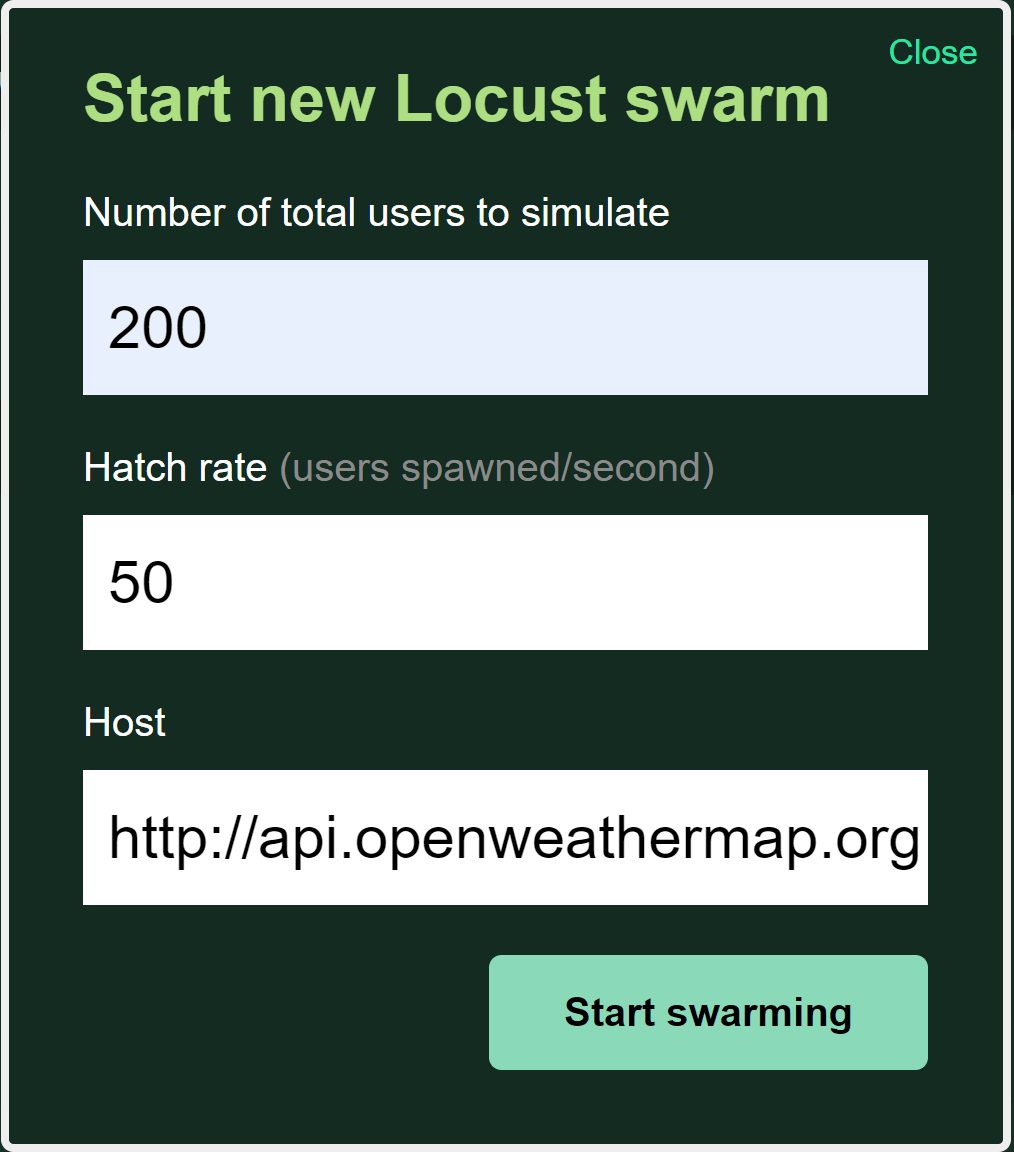
You should have the Web UI running at http://localhost:8089/ which will show that there are 4 Slaves connected to the master.
You can now give the hostname, number of users and hatch rate to kick start the load test.
If you want to start locust without the Web UI and generate the results in csv output, you can use below command:
env API_TOKEN=<apiKey> locust --master --csv=results --no-web -c 200 -r 50 --host http://api.openweathermap.org
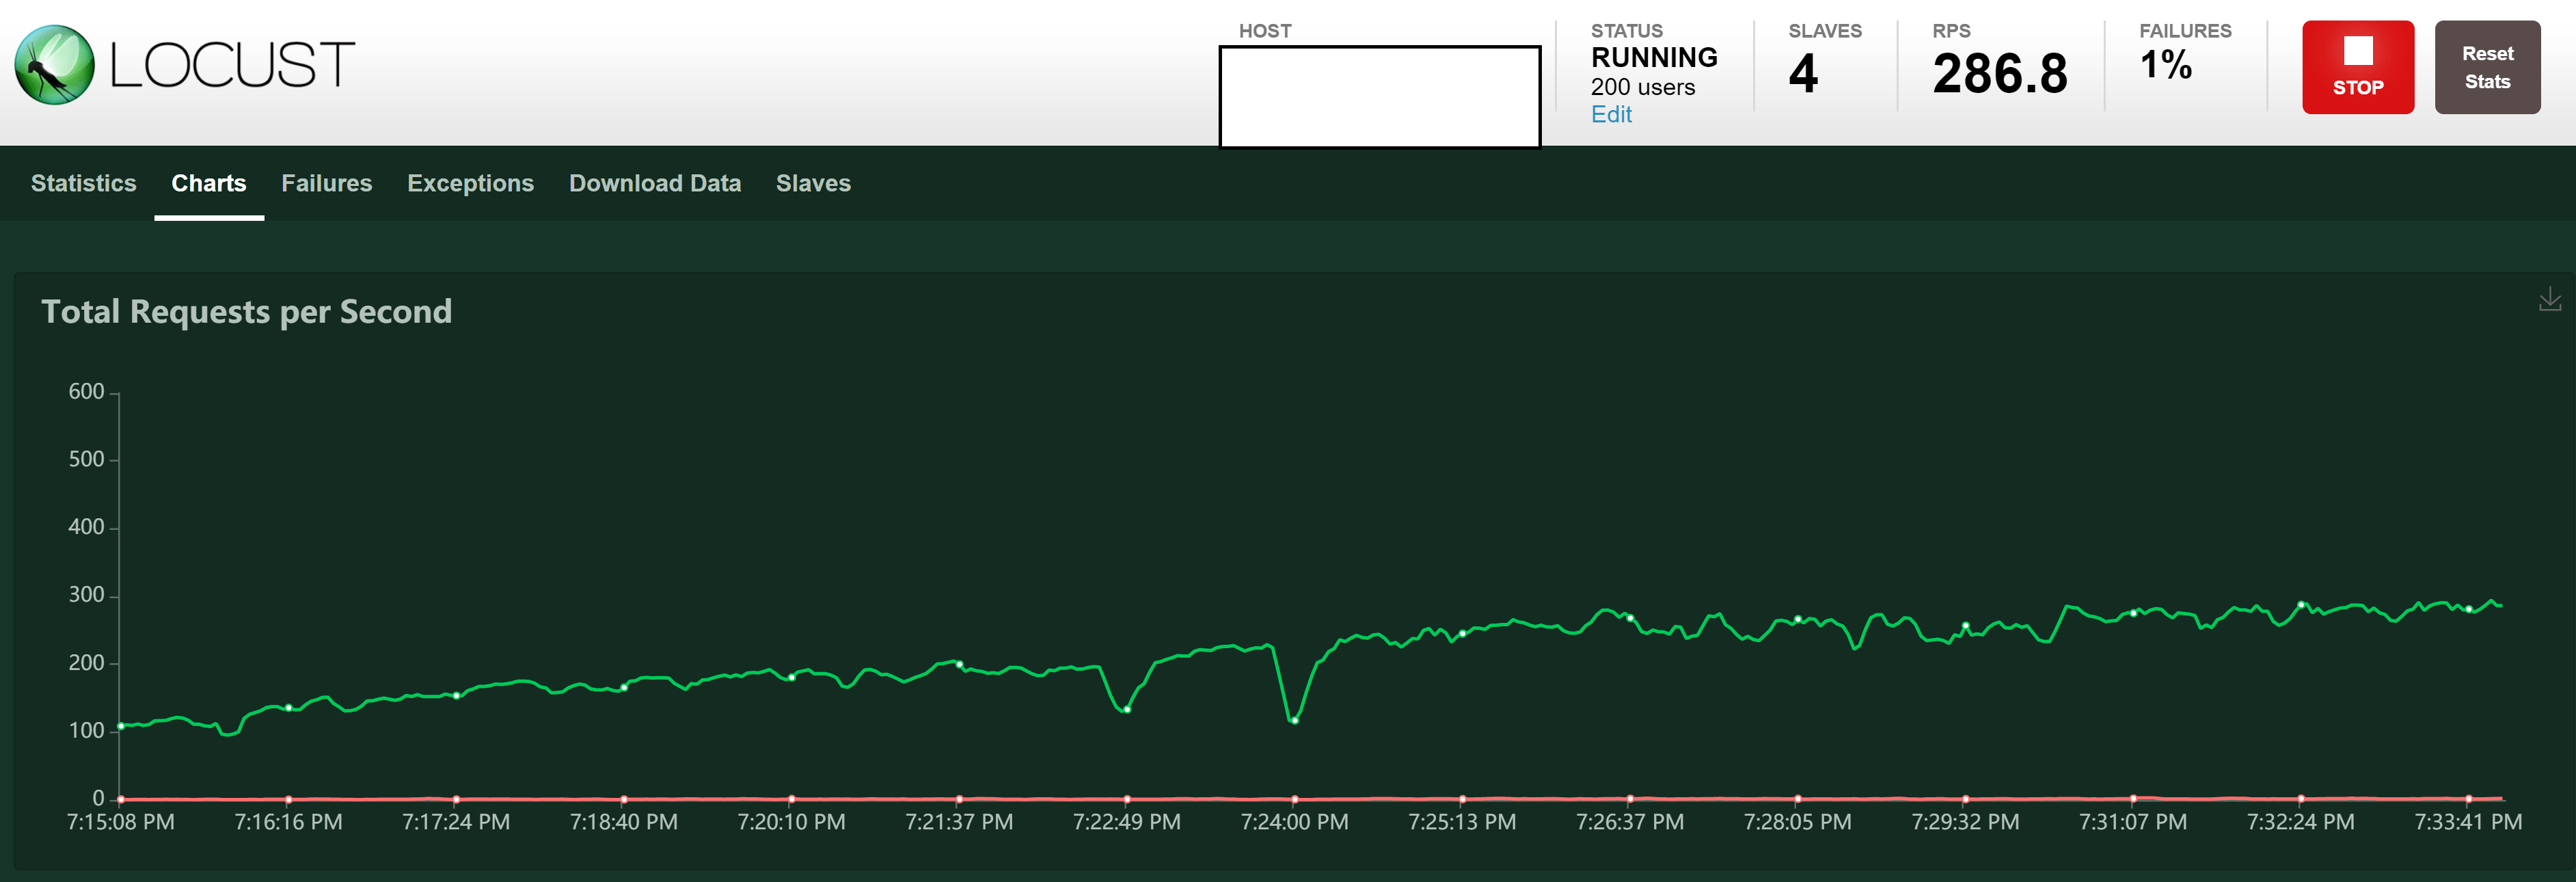
Reports
As your load test run, you can see the metrics reflected in your Web UI.