Table Of Contents
Introduction
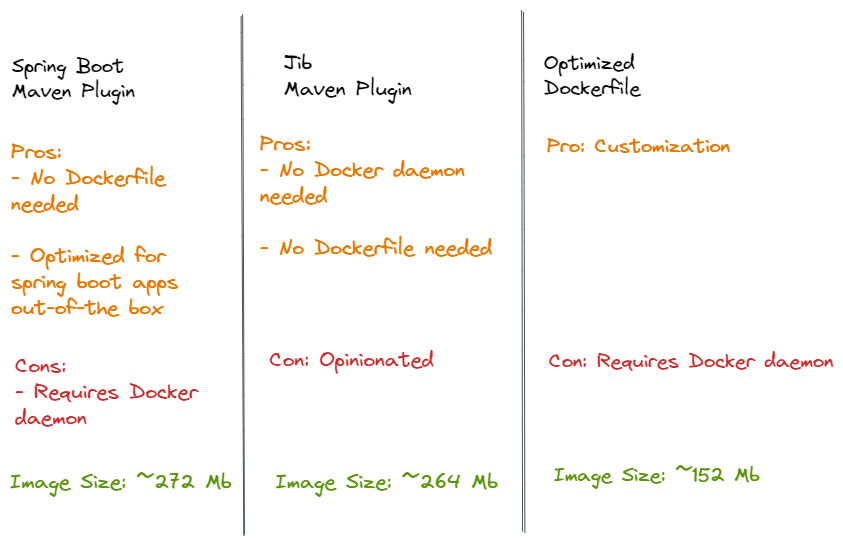
We will look at various ways to containerize a Spring Boot application.
Note - Above is not an exhaustive comparison
You can refer below sample project for the complete setup.

Spring Boot Maven Plugin
You can use the Spring Boot build plugin for Maven to create container images.
The plugin creates an OCI image (the same format as one created by docker build) by using Cloud Native Buildpacks.
You do not need a Dockerfile, but you do need a Docker daemon running in your local or remote.
To use Spring Boot Maven plugin, include below XML in your pom.xml:
<project>
  <modelVersion>4.0.0</modelVersion>
  <groupId>com.springboot.example</groupId>
  <artifactId>spring-boot-example</artifactId>
  <version>1.0-SNAPSHOT</version>

  <properties>
    <spring.boot.version>2.7.2</spring.boot.version>
  </properties>

  <build>
    <plugins>
      <plugin>
        <groupId>org.springframework.boot</groupId>
        <artifactId>spring-boot-maven-plugin</artifactId>
        <version>${spring.boot.version}</version>
      </plugin>
    </plugins>
  </build>
</project>
Above plugin has spring-boot:build-image goal, which packages an application into an OCI image using buildpack.
For example, you can build an image using below command:
./mvnw spring-boot:build-image
You can also specify the image name using spring-boot.build-image.imageName parameter:
./mvnw spring-boot:build-image -Dspring-boot.build-image.imageName=spring-boot-example
Spring Boot build-image goal uses Paketo Buildpacks to build the OCI compliant image.
Above command performs the following actions:
- Pulls Paketo Base Builder image
- Pulls JRE Runtime image, Executable Jar image & Spring Boot image
- Sets JVM memory requirements as command line options inside the container
- Builds your App image
[INFO] --- spring-boot-maven-plugin:2.7.2:build-image (default-cli) @ spring-boot-example ---
[INFO] Building image 'docker.io/library/spring-boot-example:latest'
[INFO]
[INFO]  > Pulling builder image 'docker.io/paketobuildpacks/builder:base' 0%
[INFO]  > Pulling builder image 'docker.io/paketobuildpacks/builder:base' 4%
[INFO]     [creator]         $BPL_JVM_THREAD_COUNT        250                                                          the number of threads in memory calculation
[INFO]     [creator]         $JAVA_TOOL_OPTIONS                                                                        the JVM launch flags
[INFO]     [creator]         Using Java version 11 from BP_JVM_VERSION
[INFO]     [creator]       BellSoft Liberica JRE 11.0.16: Contributing to layer
[INFO]     [creator]     Paketo Executable JAR Buildpack 6.2.5
[INFO]     [creator]       https://github.com/paketo-buildpacks/executable-jar
[INFO]     [creator]     Paketo Spring Boot Buildpack 5.15.0
[INFO]     [creator]       https://github.com/paketo-buildpacks/spring-boot
[INFO] Successfully built image 'docker.io/library/spring-boot-example:latest'
Specify JVM version
Since the buildpack only ships a single version of each supported line, updates to the buildpack can change the exact version of the JDK or JRE.
i.e. If you are running the buildpack today it might download JDK 11 assets but if the buildpack is updated to use JDK 17 then that’s what will get downloaded.
In order to lock the JVM version, you can set BP_JVM_VERSION environment variable.
For example, you can update the Spring Boot Maven plugin with the environment variable as follows:
<project>
  <modelVersion>4.0.0</modelVersion>
  <groupId>com.springboot.example</groupId>
  <artifactId>spring-boot-example</artifactId>
  <version>1.0-SNAPSHOT</version>

  <properties>
    <spring.boot.version>2.7.2</spring.boot.version>
    <java.version>11</java.version>
  </properties>

  <build>
    <plugins>
      <plugin>
        <groupId>org.springframework.boot</groupId>
        <artifactId>spring-boot-maven-plugin</artifactId>
        <version>${spring.boot.version}</version>
        <configuration>
          <image>
            <env>
              <!-- Used by Paketo Buildpacks to choose correct runtime version -->
              <BP_JVM_VERSION>${java.version}</BP_JVM_VERSION>
            </env>
          </image>
        </configuration>
      </plugin>
    </plugins>
  </build>
</project>
Jib Maven Plugin
Jib is an open source tool by Google which doesn’t need docker for building images.
Jib builds the image by using the same standard output as you get from docker build but does not use docker.
You also do not need a Dockerfile.
Jib separates local application resources from dependencies, but it goes a step further and also puts snapshot dependencies into a separate layer, since they are more likely to change.
To use Jib, add below to your pom.xml -
<project>
  <modelVersion>4.0.0</modelVersion>
  <groupId>com.springboot.example</groupId>
  <artifactId>spring-boot-example</artifactId>
  <version>1.0-SNAPSHOT</version>

  <properties>
    <spring-boot.build-image.imageName>spring-boot-example</spring-boot.build-image.imageName>
  </properties>

  <build>
    <plugin>
      <groupId>com.google.cloud.tools</groupId>
      <artifactId>jib-maven-plugin</artifactId>
      <version>3.2.1</version>
      <configuration>
        <to>
          <image>${spring-boot.build-image.imageName}</image>
        </to>
      </configuration>
    </plugin>
  </build>
</project>
Build Image without Docker Daemon
To generate container image without using docker daemon, run below maven command:
./mvnw compile jib:build
Subsequent builds run faster.
Note -
You need to be authenticated to a container registry of your choice. In our example, we didn’t specify any particular container registry so it will use DockerHub registry as default (docker login).
Jib has multiple ways to configure authentication depending on the registry of your choice. Please refer below guides as it is beyond the scope of this article -
https://github.com/GoogleContainerTools/jib/tree/master/jib-maven-plugin#authentication-methods
You will get below sample output -
[INFO] --- jib-maven-plugin:3.2.1:build (default-cli) @ spring-boot-example ---
[INFO]
[INFO] Containerizing application to spring-boot-example...
[INFO] Using base image with digest: sha256:
[INFO]
[INFO] Container entrypoint set to [java, -cp, @/app/jib-classpath-file, com.springboot.example.Example]
[INFO] Executing tasks:
[INFO] [==============================] 100.0% complete
Build Image To Docker Daemon
To build image directly to Docker daemon, run below command -
./mvnw compile jib:dockerBuild
Note - This uses the docker command line tool and requires that you have docker available on your PATH.
[INFO] --- jib-maven-plugin:3.2.1:build (default-cli) @ spring-boot-example ---
[INFO]
[INFO] Containerizing application to Docker daemon as spring-boot-example...
[INFO] Using base image with digest: sha256:
[INFO]
[INFO] Container entrypoint set to [java, -cp, @/app/jib-classpath-file, com.springboot.example.Example]
[INFO] Built image to Docker daemon as spring-boot-example
[INFO] Executing tasks:
[INFO] [==============================] 100.0% complete
Dockerfile
Let’s look at containerizing our Spring Boot app using Dockerfile approach.
We will use Multi-Stage builds approach for our Dockerfile.
With multi-stage builds, you use multiple FROM statements in your Dockerfile.
Each FROM instruction can use a different base, and each of them begins a new stage of the build.
You can selectively copy artifacts from one stage to another, leaving behind everything you don’t want in the final image. This will help with optimizing the image size as well as making the build process efficient.
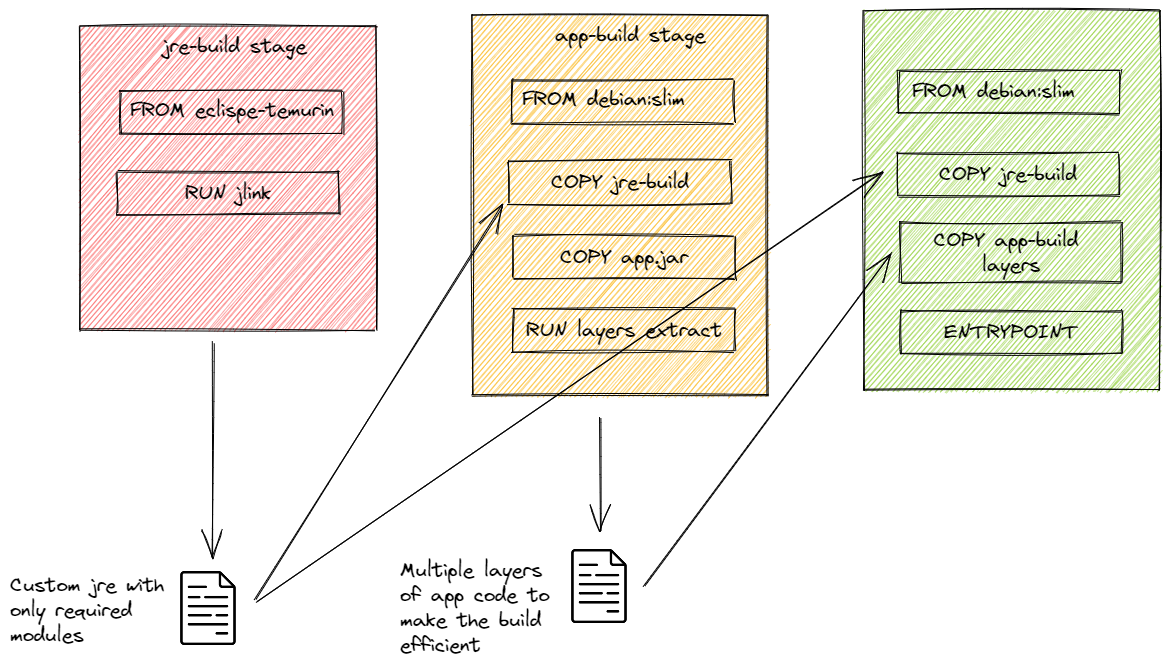
Custom JRE Image Layer
In the first build stage, we choose a distribution of our choice to create a custom JRE with only the required modules.
FROM eclipse-temurin:11 as jre-build

RUN $JAVA_HOME/bin/jlink \
         --add-modules java.base,java.naming,java.desktop,java.compiler,java.logging,java.instrument,java.management,java.security.jgss,java.sql,java.xml,java.rmi,jdk.charsets \
         --strip-debug \
         --no-man-pages \
         --no-header-files \
         --compress=2 \
         --output /javaruntime
In above, we chose eclipse-temurin as our base image.
jlink is a linker tool and can be used to link a set of modules, along with their transitive dependencies, to create a custom modular run-time image.
In principle, this would get you a smaller total image size than using the openjdk official docker images.
Notice the --add-modules argument where we supply the list of java modules that are needed for our app to run.
If you’re unsure of what modules are needed for your application, you can run below command which will scan your dependencies as well as your app code to generate the module list.
jdeps --ignore-missing-deps -q -recursive --multi-release 11 \
--print-module-deps --class-path 'target/libs/*' \
target/spring-boot-example-1.0-SNAPSHOT.jar > jre-deps.info
To generate the libs for your spring boot project, you can leverage the maven-dependency-plugin as follows:
<?xml version="1.0" encoding="UTF-8"?>
<plugin>
   <groupId>org.apache.maven.plugins</groupId>
   <artifactId>maven-dependency-plugin</artifactId>
   <version>${maven.dependency.plugin.version}</version>
   <executions>
      <execution>
         <id>copy-dependencies</id>
         <phase>package</phase>
         <goals>
            <goal>copy-dependencies</goal>
         </goals>
         <configuration>
            <outputDirectory>${project.build.directory}/libs</outputDirectory>
            <overWriteReleases>false</overWriteReleases>
            <overWriteSnapshots>false</overWriteSnapshots>
            <overWriteIfNewer>true</overWriteIfNewer>
         </configuration>
      </execution>
   </executions>
</plugin>
Spring Boot App Layer
A JAR file built with the Spring Boot Maven plugin includes layer information in the JAR file.
This layer information separates parts of the application based on how likely they are to change between application builds.
This can be used to make Docker image layers even more efficient.
The layer information can be used to extract the JAR contents into a directory for each layer as follows:
FROM debian:buster-slim as app-build

ENV JAVA_HOME=/opt/jdk
ENV PATH "${JAVA_HOME}/bin:${PATH}"

WORKDIR application

COPY --from=jre-build /javaruntime $JAVA_HOME
COPY target/spring-boot-*.jar application.jar

RUN java -Djarmode=layertools -jar application.jar extract
Notice the command java -Djarmode=layertools -jar application.jar extract which is used to extract the layers.
Also, we copy the JRE build from the previous stage so that we can run the layer extract.
We use debian slim as our base image here.
Using debian as a base image has following advantages -
- Presence of libc
- No performance issues of Alpine for certain programming languages
- Suitable for testing with tools available out of the box
Final Image
Finally, we copy the necessary files (JRE & Spring Boot App layers) from previous stages to our final stage.
FROM debian:buster-slim

ENV JAVA_HOME=/opt/jdk
ENV PATH "${JAVA_HOME}/bin:${PATH}"

WORKDIR application

COPY --from=jre-build /javaruntime $JAVA_HOME
COPY --from=app-build application/dependencies/ ./
COPY --from=app-build application/spring-boot-loader/ ./
COPY --from=app-build application/snapshot-dependencies/ ./
COPY --from=app-build application/application/ ./

ENTRYPOINT ["java", "org.springframework.boot.loader.JarLauncher"]
We use JarLauncher to start the application without hard-coding the main application class.
You can find the complete Dockerfile here -
FROM eclipse-temurin:11 as jre-build

RUN $JAVA_HOME/bin/jlink \
         --add-modules java.base,java.naming,java.desktop,java.compiler,java.logging,java.instrument,java.management,java.security.jgss,java.sql,java.xml,java.rmi,jdk.charsets \
         --strip-debug \
         --no-man-pages \
         --no-header-files \
         --compress=2 \
         --output /javaruntime

FROM debian:buster-slim as app-build

ENV JAVA_HOME=/opt/jdk
ENV PATH "${JAVA_HOME}/bin:${PATH}"

WORKDIR application

COPY --from=jre-build /javaruntime $JAVA_HOME
COPY target/spring-boot-*.jar application.jar

RUN java -Djarmode=layertools -jar application.jar extract

FROM debian:buster-slim

ENV JAVA_HOME=/opt/jdk
ENV PATH "${JAVA_HOME}/bin:${PATH}"

WORKDIR application

COPY --from=jre-build /javaruntime $JAVA_HOME
COPY --from=app-build application/dependencies/ ./
COPY --from=app-build application/spring-boot-loader/ ./
COPY --from=app-build application/snapshot-dependencies/ ./
COPY --from=app-build application/application/ ./

ENTRYPOINT ["java", "org.springframework.boot.loader.JarLauncher"]
You can see that the final image size is just 152 MB.
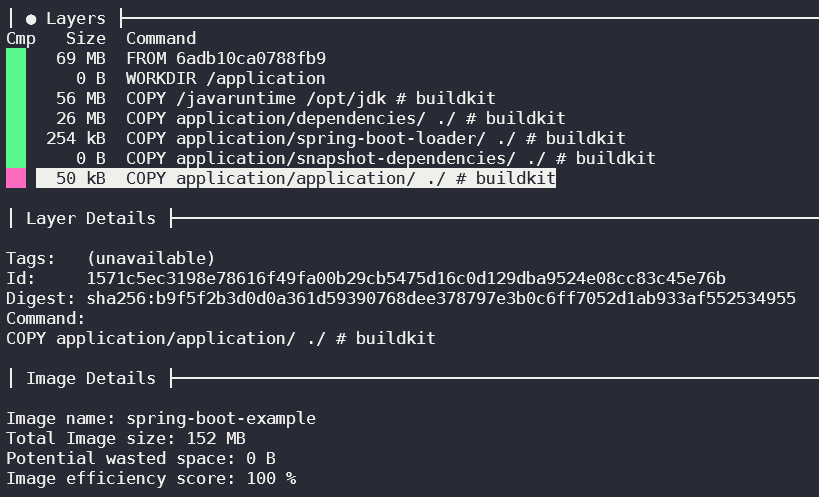
Layer Caching
Let’s see how our spring boot layered approach helps with faster re-builds leveraging layer caching.
When you build the image for the first time, docker steps through the instructions in your Dockerfile, executing each in the order specified. It generates a checksum for each of the layers
- For ADD and COPY instructions, checksum is based on the file content.
- For RUN, the checksum is based on the command and not on the files.
On subsequent builds, it compares the existing checksums with the new one, so if both match it uses the respective cached layer.
Below we can see that the build leverages cache for spring boot layers since nothing changed between subsequent builds.

Let’s do a small code change in our app and run the docker build again. We see that the build is still fast as you can see from below, only the app code is updated (COPY instruction) while rest of the layers are from cache (dependencies etc.) since they didn’t change.
