Table Of Contents
This upgrade guide is for self-managed nodes.
Note
-
Amazon EKS performs standard infrastructure and readiness health checks for network traffic on these new nodes to verify that they’re working as expected. If any of these checks fail, Amazon EKS reverts the infrastructure deployment, and your cluster remains on the prior Kubernetes version.
-
Running applications aren’t affected (only for control plane upgrade), and your cluster is never left in a non-deterministic or unrecoverable state.
-
Even though Amazon EKS runs a highly available control plane, you might experience minor service interruptions during an update. For example, if you attempt to connect to an API server just before or just after it’s terminated and replaced by a new API server running the new version of Kubernetes, you might experience API call errors or connectivity issues. If this happens, retry your API operations until they succeed.
-
The Kubernetes minor version of the nodes in your cluster must be the same as the version of your control plane’s current version before you update your control plane to a new Kubernetes version.
-
You can update only one minor version at a time. Therefore, if your current version is 1.18 and you want to update to 1.20, then you must first update your cluster to 1.19 and then update it from 1.19 to 1.20.
Things To Check
-
Amazon EKS requires two to three free IP addresses from the subnets that were provided when you created the cluster. If these subnets don’t have available IP addresses, then the update can fail.
-
AWS has a limit of 60 rules per security group. Make sure you haven’t reached the limit for the sg used by your cluster. For e.g. if you create an NLB per API deployment then you will easily hit this limit as each NLB creates multiple rules. Your ALB controller will then throw security group rules exceeded error as it tries to evict pods and have them created in the new nodes. This will take more effort to rectify resulting in potential downtime.
Upgrade Steps
[1] Set kubectl context to the cluster that you want to upgrade.
kubectl config use-context arn:aws:eks:[region]:[account_number]:cluster/[cluster_name]
[2] Check the Kubernetes version of your cluster control plane.
kubectl version --short
Sample Output:
Client Version: v1.21.14
Server Version: v1.20.15-eks-ba74326
[3] Check the Kubernetes version of your nodes.
kubectl get nodes
Sample Output:
NAME                          STATUS   ROLES    AGE    VERSION
ip-10-0-xx-xx.ec2.internal    Ready    <none>   283d   v1.20.15-eks-ba74326
ip-10-0-xx-xx.ec2.internal    Ready    <none>   313d   v1.20.15-eks-ba74326
ip-10-0-xx-xx.ec2.internal    Ready    <none>   287d   v1.20.15-eks-ba74326
[4] Confirm that the control plane version and node minor versions are matching before you proceed with the upgrade i.e. both are on 1.20.x version.
[5] Ensure that the eks privileged policy exists and is not showing any error.
kubectl get psp eks.privileged
Example Output:
NAME             PRIV   CAPS   SELINUX    RUNASUSER   FSGROUP    SUPGROUP   READONLYROOTFS   VOLUMES
eks.privileged   true   *      RunAsAny   RunAsAny    RunAsAny   RunAsAny   false            *
Control Plane Upgrade
Kube Version
[1] If you are using IaC (Infrastructure As Code) tool, say terraform, you will update the Kubernetes version in that and apply your changes.
Sample terraform vars change:
kubernetes_version = "1.21"
When you run terraform plan, it should show a change from 1.20 to 1.21 as shown below:
~ version = "1.20" -> "1.21"
Note: You can only update one minor version at a time. Otherwise, terraform will return this error: error updating EKS Cluster version: InvalidParameterException: Unsupported Kubernetes minor version update from 1.19 to 1.21
AMI
Also, depending on the terraform module which you are using for EKS cluster management, it will show a new AMI ID in the plan output which is configured for the target kubernetes version.
e.g.
~ image_id = "ami-0e1ce97e46e7a027f" -> "ami-0d78302dd24db83c7"
Alternatively, if the AMI is hardcoded in terraform, you can get the AMI pertaining to the target kubernetes version from this link - https://docs.aws.amazon.com/eks/latest/userguide/eks-optimized-ami.html
Update the AMI ID in the terraform code.
Launch Template
Typically, a new launch template version will be created for the AMI change by your terraform module.
There are two important settings that will drive how the upgrade is done.
default_version in the launch template needs to be set to the new template version. This will be suggested automatically by your plan output or you need to configure it in case of hardcoded version number.
Your auto scaling group, should have been configured to pick either the latest (or) default version of the launch template. If that’s not the case you need to update your terraform code to pick the new launch template version so that any new nodes launched will use the new AMI image.
  ~ resource "aws_launch_template" "default" {
        arn                                  = "arn:aws:ec2:us-east-1::launch-template/lt-"
      ~ default_version                      = 4 -> (known after apply)
        id                                   = "lt-"
      ~ image_id                             = "ami-0e1ce97e46e7a027f" -> "ami-0d78302dd24db83c7"
        instance_type                        = "r5a.xlarge"
      ~ latest_version                       = 4 -> (known after apply)
        name                                 = prod-eks-20210217125057781700000004"
        update_default_version               = true
Your plan output could be something like above where a new default and latest version is being set. Also, update_default_version flag here updates the default version to the latest template.
Review all your plan output and apply the changes.
It takes around 40 mins for the control plane upgrade to complete.
[2] Verify the version of your cluster control plane post the upgrade.
kubectl version --short
Sample Output:
Client Version: v1.21.4
Server Version: v1.21.14-eks-6d3986b
Node Upgrade
[1] If you have cluster autoscaler installed, disable it by scaling down the deployment down to zero replicas to avoid conflicting scaling actions.
kubectl scale deployments/cluster-autoscaler --replicas=0 -n kube-system
[2] If you have Automatic scaling policies defined based on CPU thresholds, disable them to avoid any conflicts.
Go to Automatic scaling tab in auto-scaling section of AWS console https://console.aws.amazon.com/ec2autoscaling/home?region=us-east-1#/details/ and set both the scale-down and scale-up policies to disabled state.
[3] Get the autoscaling group name of the cluster using tags as shown below:
e.g. assume that your cluster is named pes-prod-eks-cluster then you could use tags to identify the autoscaling groups
Tag Name -> pes-prod-eks-cluster
Update below script based on the tags that you use.
cluster_name=`kubectl config current-context | cut -d '/' -f2`
auto_scaling_group_name=`aws autoscaling describe-auto-scaling-groups --query "AutoScalingGroups[? Tags[? (Key=='Name') && Value=='\${cluster_name}']]".AutoScalingGroupName --output text`
[4] Increase the node capacity by 1 using below commands:
Note - In case max capacity limits the addition of new node, we also increase the max capacity by 1
current_desired_capacity=`aws autoscaling describe-auto-scaling-groups --query "AutoScalingGroups[? Tags[? (Key=='Name') && Value=='\${cluster_name}']]".DesiredCapacity --output text`
current_max_capacity=`aws autoscaling describe-auto-scaling-groups --query "AutoScalingGroups[? Tags[? (Key=='Name') && Value=='\${cluster_name}']]".MaxSize --output text`
new_desired_capacity=`expr "${current_desired_capacity}" + 1`
if [ ${new_desired_capacity} -gt ${current_max_capacity} ]
then
    new_max_capacity=`expr "${current_max_capacity}" + 1`
    aws autoscaling  update-auto-scaling-group --auto-scaling-group-name ${auto_scaling_group_name} --max-size ${new_max_capacity}
fi
aws autoscaling set-desired-capacity --auto-scaling-group-name ${auto_scaling_group_name} --desired-capacity ${new_desired_capacity}
[5] Wait for the new node to spin up and be in Healthy status. This can be checked in the Instance management tab of the auto-scaling group in AWS console.
[6] Check that the new node is using latest AMI by running this command:
kubectl get nodes
Sample Output:
NAME                          STATUS   ROLES    AGE     VERSION
ip-10-0-xx-xx.ec2.internal    Ready    <none>   2d6h    v1.20.15-eks-ba74326
ip-10-0-xx-xx.ec2.internal    Ready    <none>   2d6h    v1.20.15-eks-ba74326
ip-10-0-xx-xx.ec2.internal    Ready    <none>   2m37s   v1.21.14-eks-6d3986b <-- new AMI
[7] Taint the nodes that aren’t labelled with the latest AMI ID so that no new pods are scheduled there.
In above example, any node that has version v1.20.15-eks-ba74326 is referred to as not using latest AMI and needs to be tainted.
K8S_VERSION="1.20"
nodes=($(kubectl get nodes -o json | jq -r '.items[] | select(.status.nodeInfo.kubeletVersion | contains('\"v$K8S_VERSION\"')) | .metadata.name' | tr '\n' ' '))
for node in ${nodes[@]}
do
    echo "Tainting $node"
    kubectl taint nodes $node key=value:NoSchedule
done
Note: You need to have "jq" installed in your bash
Example Output:
Tainting ip-10-0-xx-xx.ec2.internal
node/ip-10-0-xx-xx.ec2.internal tainted
[8] We then drain the old nodes one-by-one. This will move all the pods to the new nodes.
As each node is drained, we also terminate that node.
Since, autoscaling is configured with a desired capacity, this will trigger an autoscaling activity to add a new node to maintain capacity.
This new node will be using Kubernetes version 1.21 since the launch template will use the default/latest version having 1.21 AMI image.
K8S_VERSION="1.20"
nodes=($(kubectl get nodes -o json | jq -r '.items[] | select(.status.nodeInfo.kubeletVersion | contains('\"v$K8S_VERSION\"')) | .metadata.name' | tr '\n' ' '))
for node in ${nodes[@]}
do
    echo "Draining $node"
    kubectl drain $node --ignore-daemonsets --delete-emptydir-data
    echo "Sleeping for 5 mins to allow pod startups in new node"
    sleep 300
    echo "Terminating $node"
    instance_id=$(kubectl get nodes -o json | jq -r '.items[] | select(.metadata.name == '\"$node\"') | .spec.providerID' | sed 's/.*\(i-.*\)/\1/')
    aws autoscaling terminate-instance-in-auto-scaling-group --instance-id $instance_id --no-should-decrement-desired-capacity
done
Example output:
Draining ip-10-0-xx-xx.ec2.internal
node/ip-10-0-xx-xx.ec2.internal cordoned
evicting pod xxx
[9] Ensure that all the pods are in running state.
kubectl get pods --field-selector=status.phase!=Running --all-namespaces
Above command should return no resources found if everything is looking good.
Investigate any issues where the pods are not in running state.
[10] Check that the old nodes have been removed completely.
kubectl get nodes
Note: It might take some time for the nodes to shutdown
[11] We then decrease desired and maximum capacity to their original values.
current_desired_capacity=`aws autoscaling describe-auto-scaling-groups --query "AutoScalingGroups[? Tags[? (Key=='Name') && Value=='\${worker_tag}-workers']]".DesiredCapacity --output text`
current_max_capacity=`aws autoscaling describe-auto-scaling-groups --query "AutoScalingGroups[? Tags[? (Key=='Name') && Value=='\${worker_tag}-workers']]".MaxSize --output text`
new_desired_capacity=`expr "${current_desired_capacity}" - 1`
if [ ${current_desired_capacity} -eq ${current_max_capacity} ]
then
    new_max_capacity=`expr "${current_max_capacity}" - 1`
    aws autoscaling  update-auto-scaling-group --auto-scaling-group-name ${auto_scaling_group_name} --max-size ${new_max_capacity}
fi
aws autoscaling set-desired-capacity --auto-scaling-group-name ${auto_scaling_group_name} --desired-capacity ${new_desired_capacity}
[12] Enable cluster autoscaler by scaling the deployment back to one replica.
kubectl scale deployments/cluster-autoscaler --replicas=1 -n kube-system
Plugins Upgrade
VPC CNI Plugin
Recommended Amazon VPC CNI plugin version - 1.11.x (Latest patch)
Note: We recommend that you update to the latest patch version for the latest minor version, but that you only update one minor version at a time. For example, if your current minor version is 1.8 and you want to update to 1.10, you should update to the latest patch version of 1.9 first, then update to the latest patch version of 1.10.
[1] Check the current VPC CNI version
kubectl describe daemonset aws-node --namespace kube-system | grep Image | cut -d "/" -f 2
[2] Download 1.11.3 VPC CNI manifest file.
curl -o aws-k8s-cni-1-11-3.yaml https://raw.githubusercontent.com/aws/amazon-vpc-cni-k8s/v1.11.3/config/master/aws-k8s-cni.yaml
[3] If necessary, replace <region-code> in the following command with the Region that your cluster is in and then run the modified command to replace the Region code in the file (currently us-west-2).
sed -i.bak -e 's/us-west-2/<region-code>/' aws-k8s-cni-1-11-3.yaml
[4] If necessary, replace <account> in the following command with the account from Amazon EKS add-on container image addresses https://docs.aws.amazon.com/eks/latest/userguide/add-ons-images.html for the Region that your cluster is in and then run the modified command to replace the account in the file (currently 602401143452).
sed -i.bak -e 's/602401143452/<account>/' aws-k8s-cni-1-11-3.yaml
[5] Apply the manifest file to your cluster.
kubectl apply -f aws-k8s-cni-1-11-3.yaml
[6] Verify that the new CNI version is available
$ kubectl describe daemonset aws-node --namespace kube-system | grep Image | cut -d "/" -f 2

amazon-k8s-cni-init:v1.11.3
amazon-k8s-cni:v1.11.3
CoreDNS Plugin
Recommended CoreDNS plugin version - 1.8.4-eksbuild.1
[1] Check the current CoreDNS version
kubectl describe pod coredns --namespace kube-system | grep Image |grep eksbuild | cut -d "/" -f 3
[2] Upgrade the plugin image version
kubectl set image --namespace kube-system deployment.apps/coredns \
    coredns=602401143452.dkr.ecr.us-east-1.amazonaws.com/eks/coredns:v1.8.4-eksbuild.1
Kube Proxy Plugin
Recommended kube-proxy version for Kubernetes 1.21 version is 1.21.14-eksbuild.2
[1] Check the current proxy version
kubectl get daemonset kube-proxy --namespace kube-system -o=jsonpath='{$.spec.template.spec.containers[:1].image}'
[2] Upgrade the kube-proxy plugin image
kubectl set image daemonset.apps/kube-proxy \
     -n kube-system \
     kube-proxy=602401143452.dkr.ecr.us-east-1.amazonaws.com/eks/kube-proxy:v1.21.14-eksbuild.2
That’s it, you are done with the upgrade. Now it’s time to check that you haven’t broken anything :)
Service Account Tokens
The BoundServiceAccountTokenVolume feature is enabled by default in Kubernetes version 1.21 and later.
This feature improves the security of service account tokens by allowing workloads running on Kubernetes to request JSON web tokens that are audience, time, and key bound.
Service account tokens have an expiration of one hour. In earlier Kubernetes versions, the tokens didn’t have an expiration.
This means that clients that rely on these tokens must refresh the tokens within an hour.
If your workload is using an older client version, then you must update it.
To enable a smooth migration of clients to the newer time-bound service account tokens, Kubernetes version 1.21 and later adds an extended expiry period to the service account token over the default one hour.
For Amazon EKS clusters, the extended expiry period is 90 days.
Your Amazon EKS cluster’s Kubernetes API server rejects requests with tokens older than 90 days.
We recommend that you check your applications and their dependencies to make sure that the Kubernetes client SDKs are the same or later than the versions listed previously.
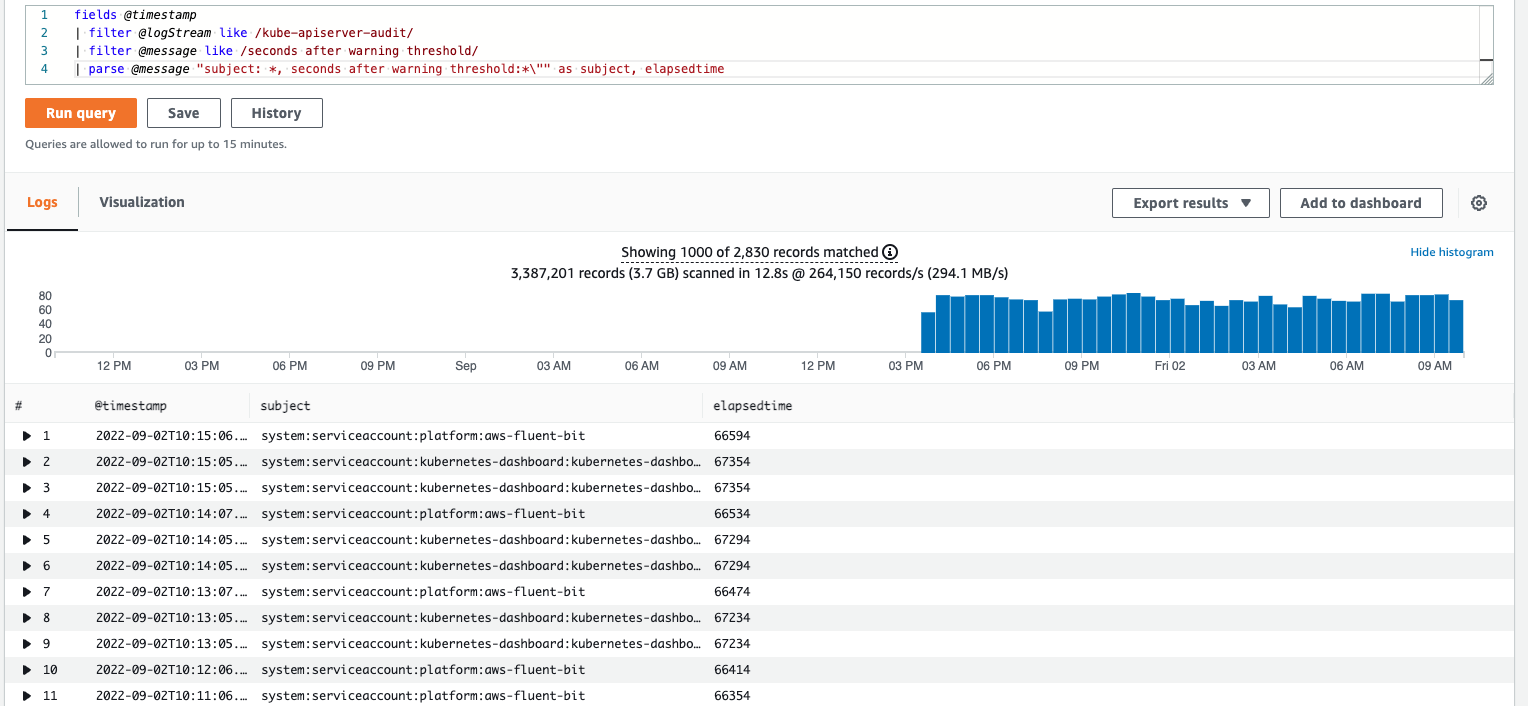
To identify applications that needs to be updated (using stale tokens), enable control plane logging and run below query in Cloudwatch insights:
fields @timestamp
| filter @logStream like /kube-apiserver-audit/
| filter @message like /seconds after warning threshold/
| parse @message "subject: *, seconds after warning threshold:*\"" as subject, elapsedtime
For example, we run above query and see that kubernetes dashboard and fluenbit logging need to be updated as they are using client SDKs which are not refreshing their service tokens.
So, you find the appropriate version and update the helm charts of those installations and upgrade them.
Jenkins Pipeline Script
Below you can find a sample script to perform the same upgrade steps in Jenkins: