Table Of Contents
Introduction
We will be looking at ways to reduce your S3 bill by addressing inefficient default practices.
Storage Lens
Before we start to implement any rules for optimizing the storage costs, the first step would be to enable S3 Storage Lens dashboard.
S3 Storage Lens helps us to get visibility into the object storage with metrics and trends which helps us to answer many questions such as -
- Top buckets in terms of storage across all regions
- Top prefixes across all buckets and regions
- Storage class distribution
- Drill down into various metrics such as active buckets, non-current version bytes, incomplete multi-part upload count etc,
All of these help us to understand the utilization, access patterns, cost practices that we can apply for the buckets in your accounts.
To enable Storage Lens, navigate to Storage Lens service and create a new dashboard.
Creating Dashboard
In the dashboard scope, specify Include all Regions and buckets so that you get everything in one dashboard.
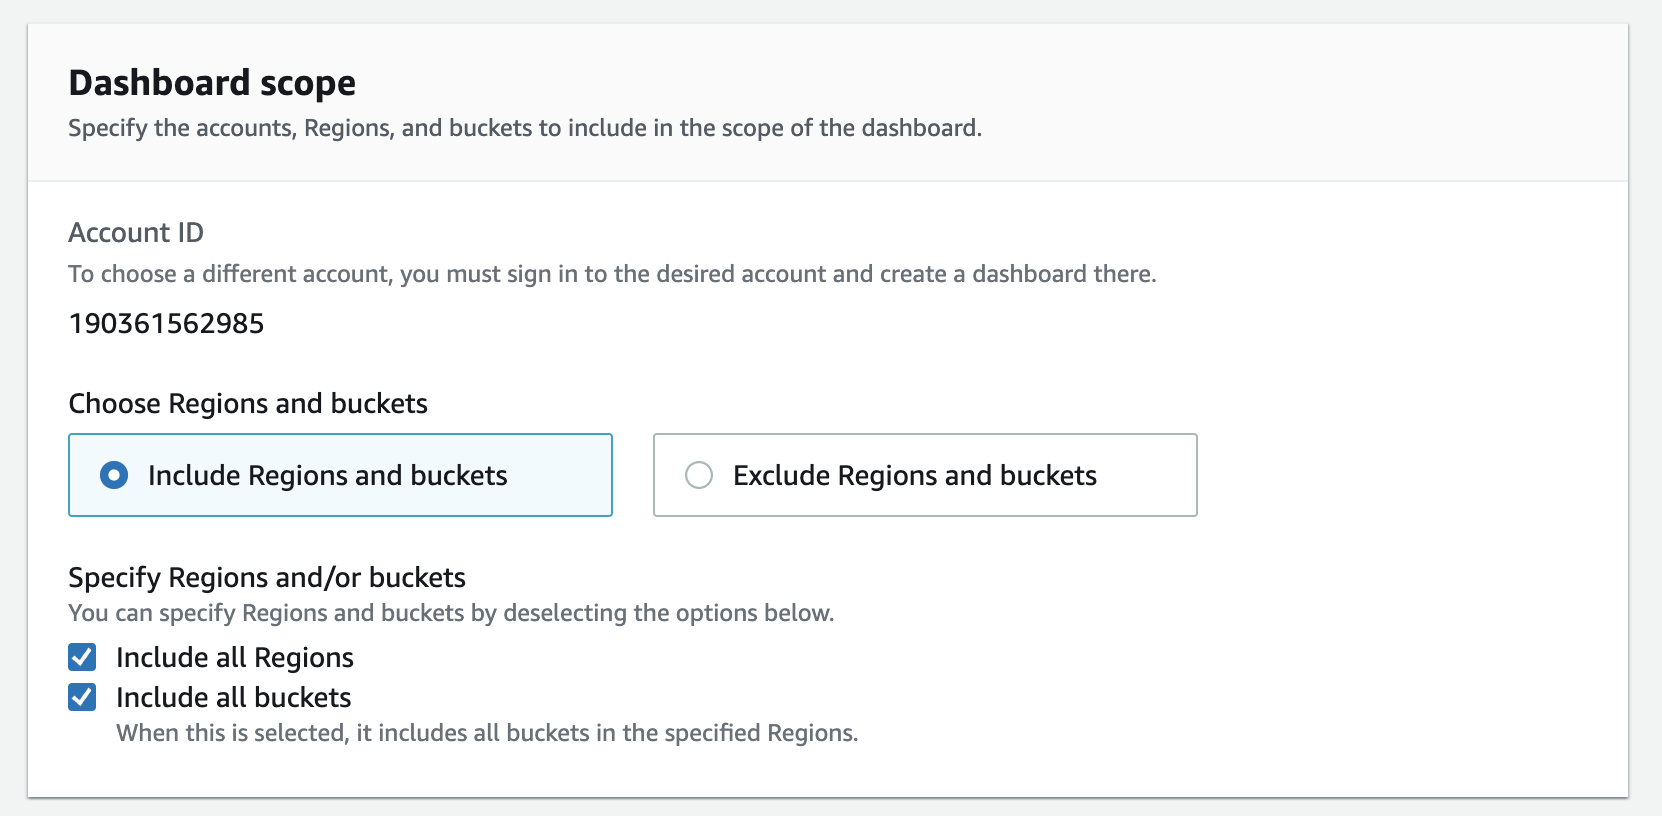
You might have buckets which are shared for different purposes/projects/teams and so you might want to drill down at prefix level.
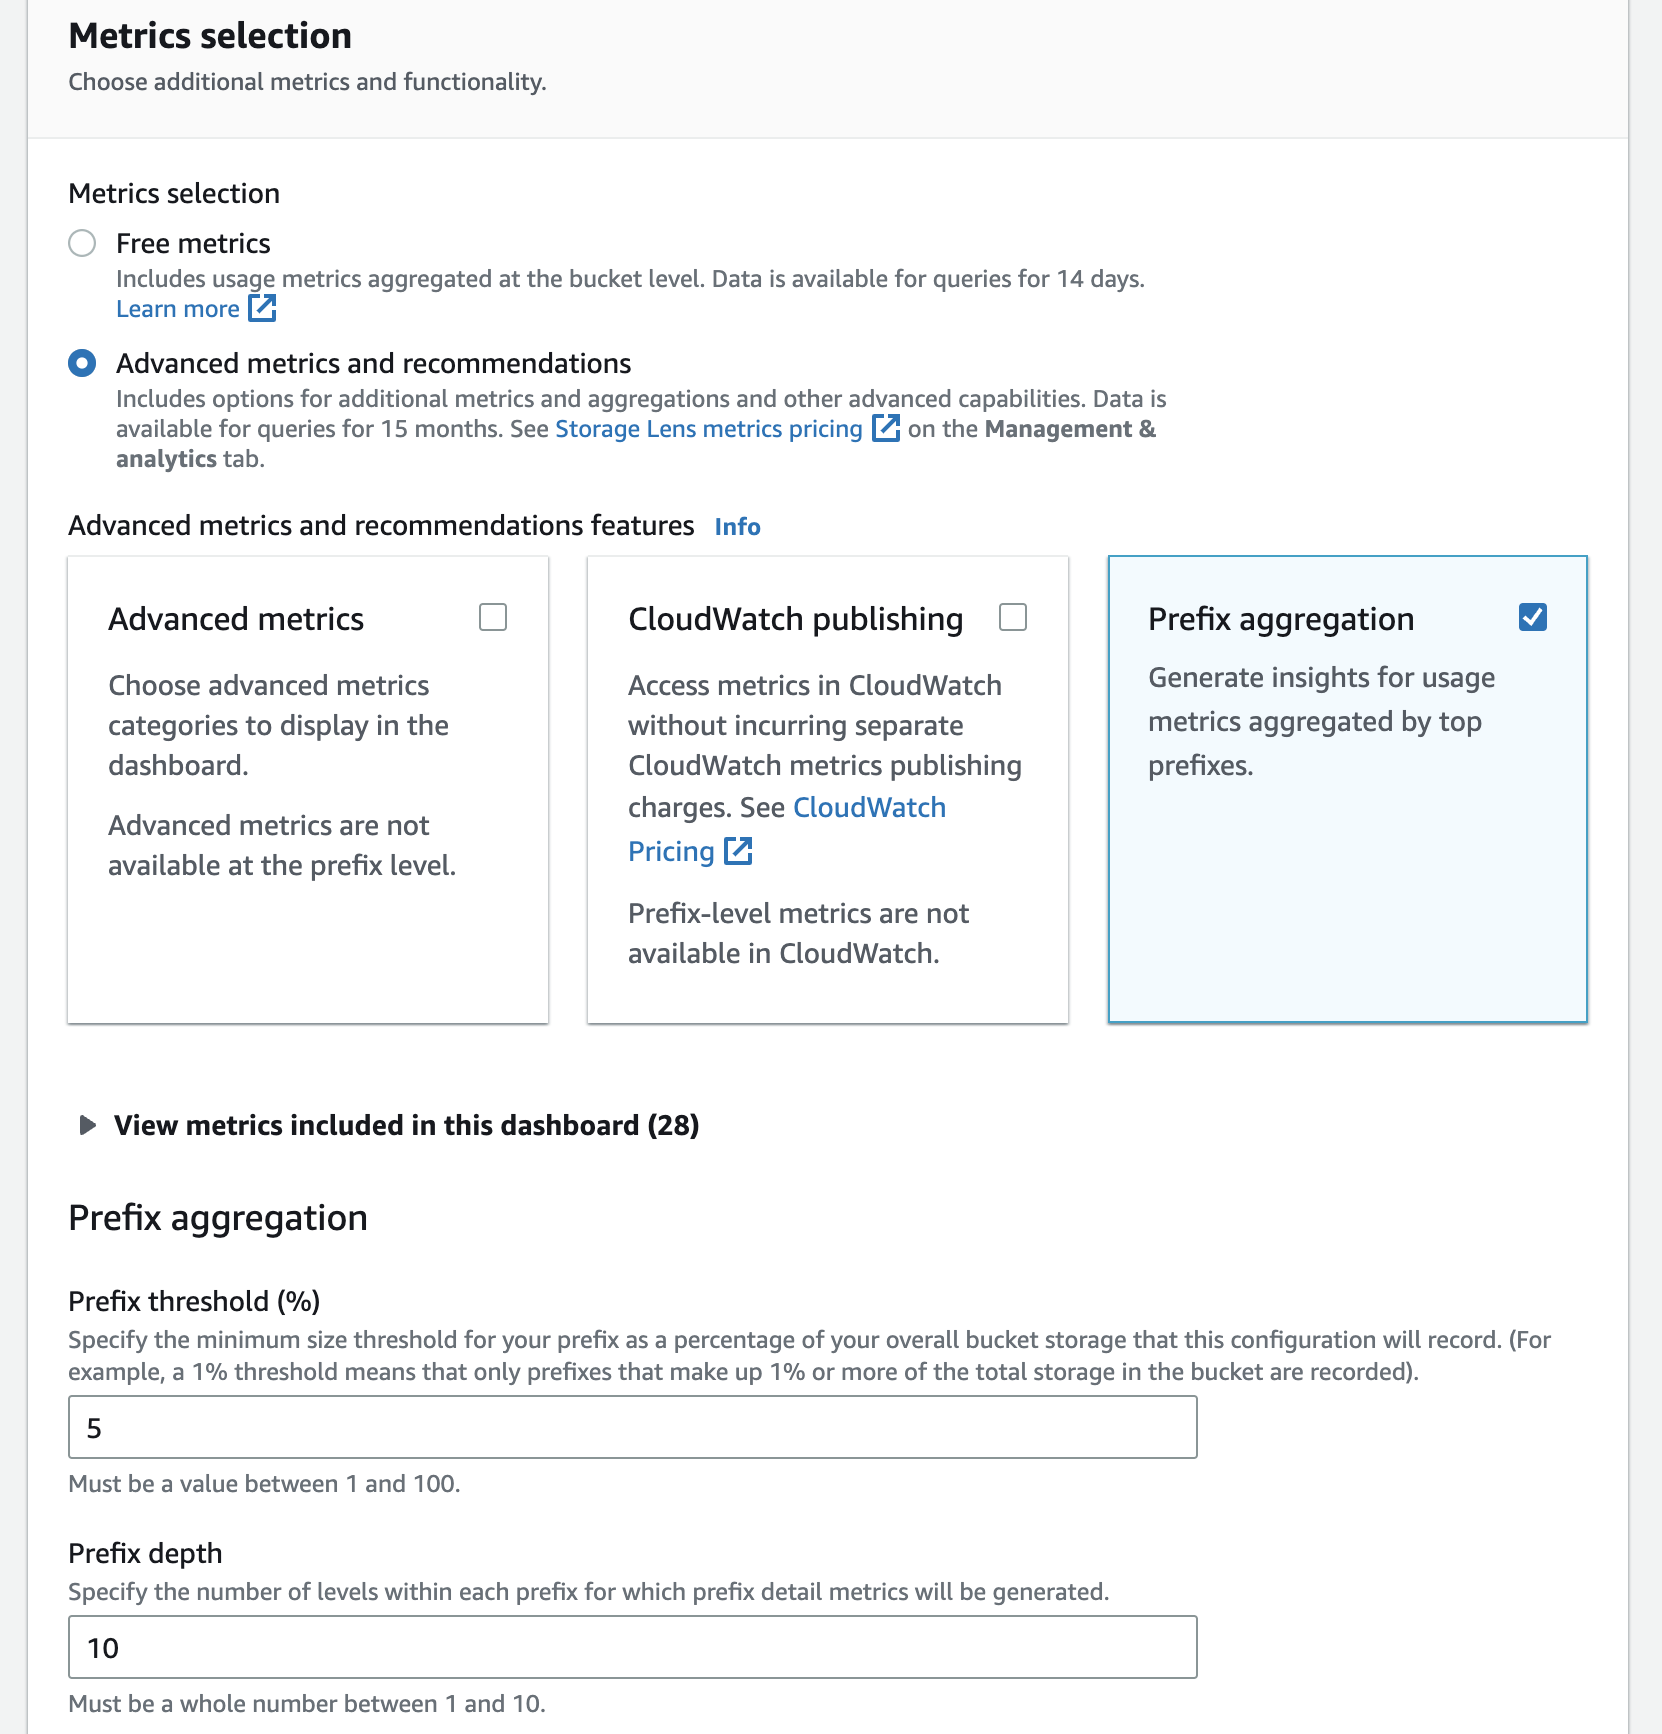
So, in those cases, enable Advanced Metrics and recommendations and further Prefix aggregation.
Depending on the level of nested prefixes, choose the Prefix threshold and Prefix depth.
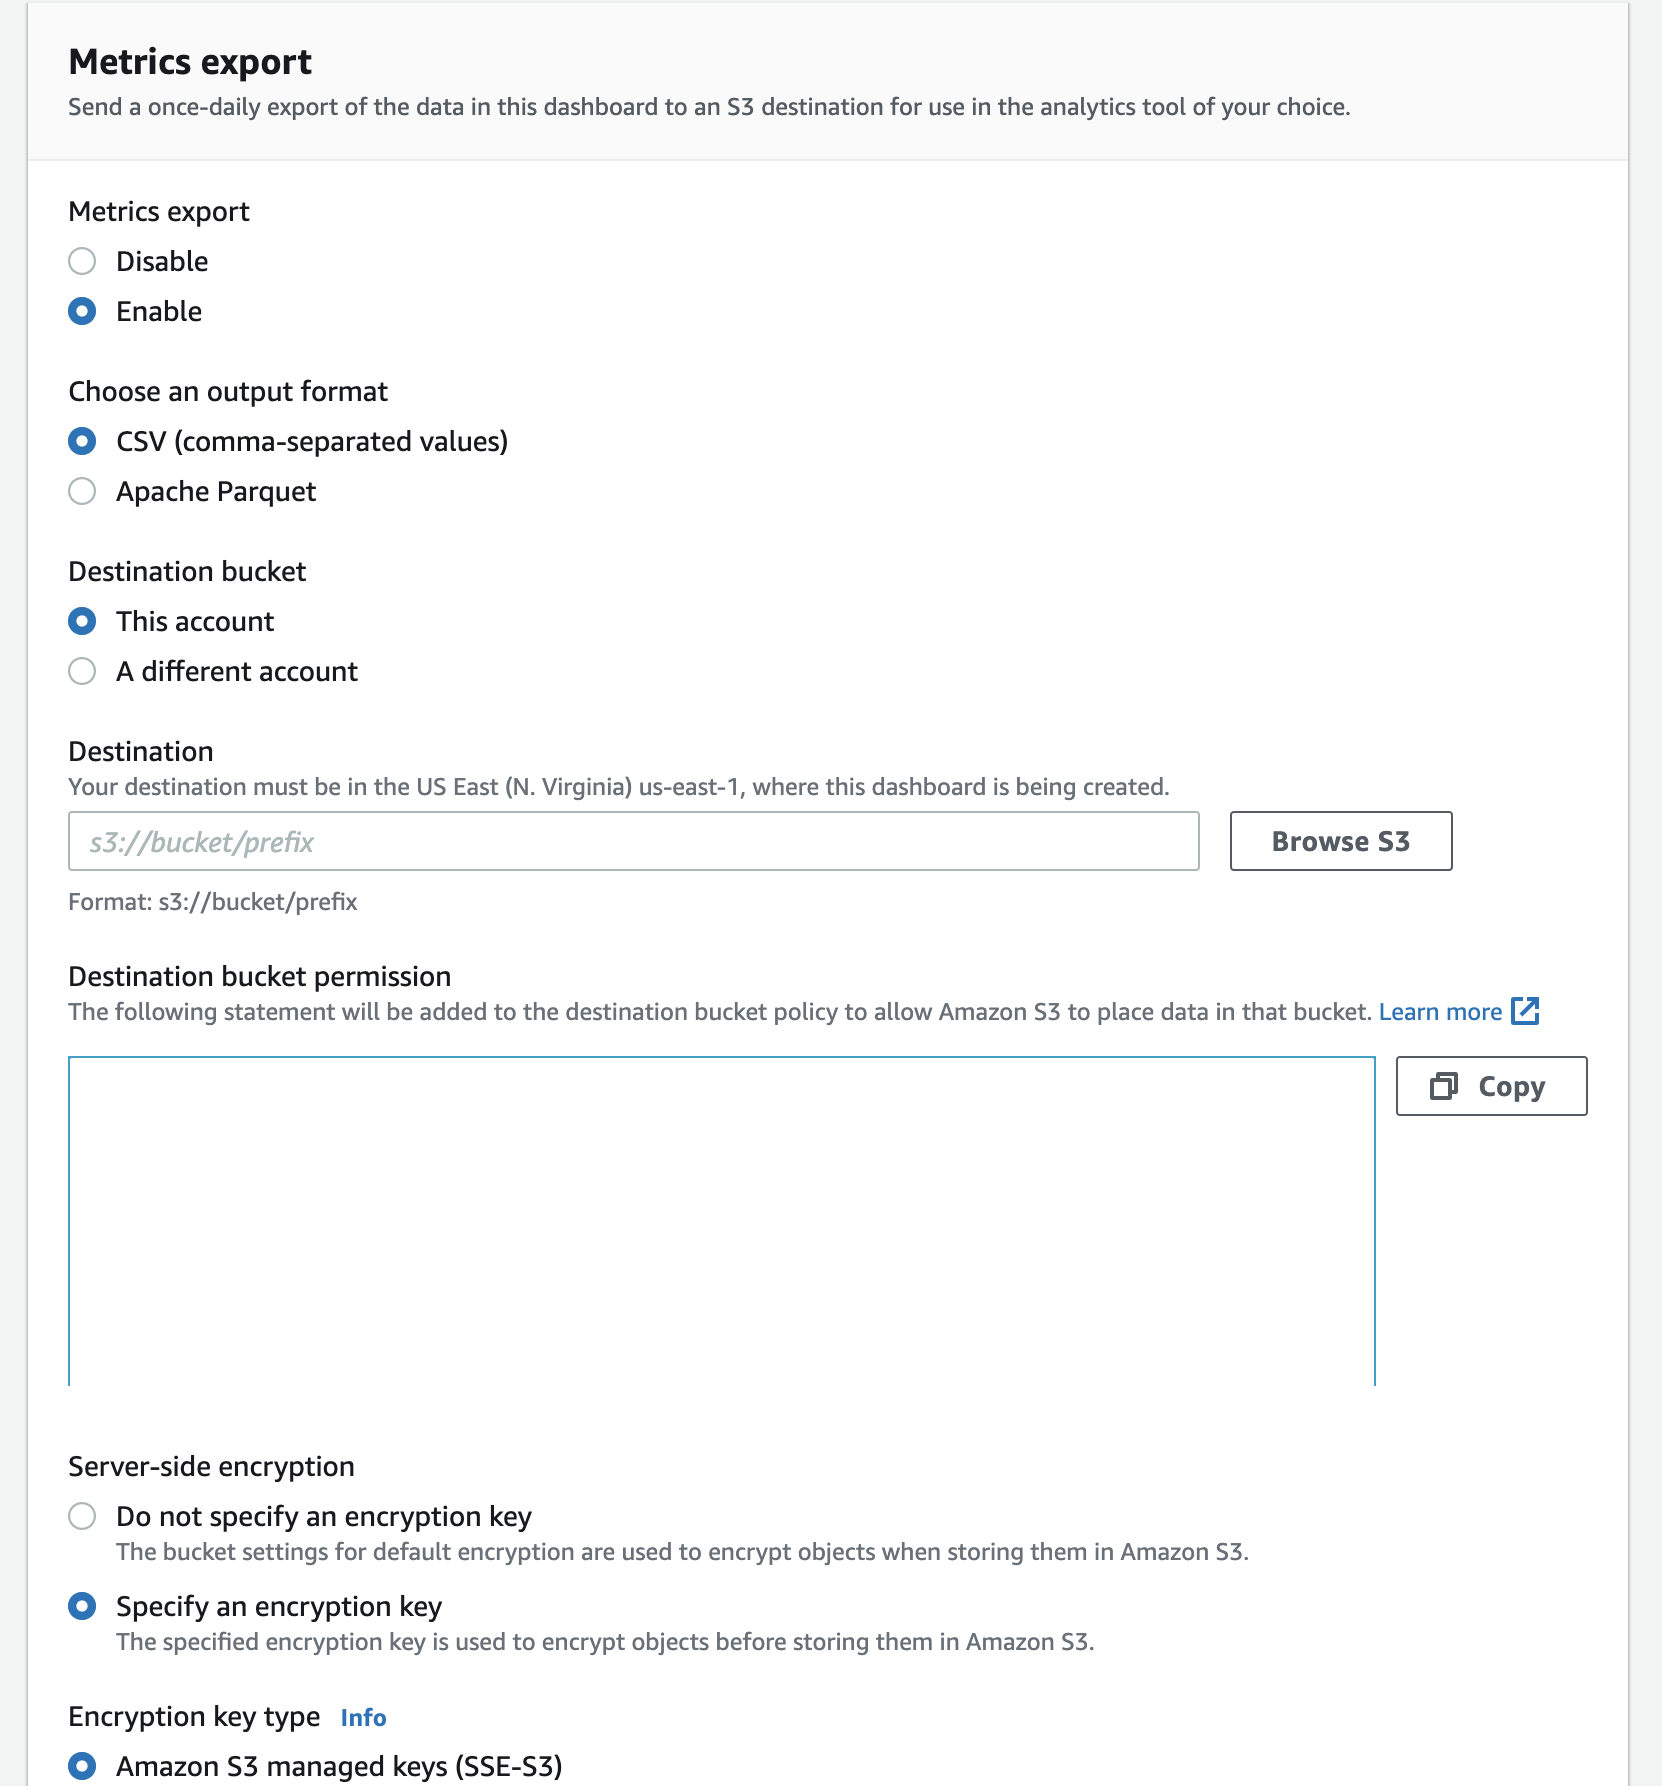
Finally, if you want to do analysis of the metrics, you can set up a daily export to S3 as shown below and enable server side encryption.
Metrics & Trends
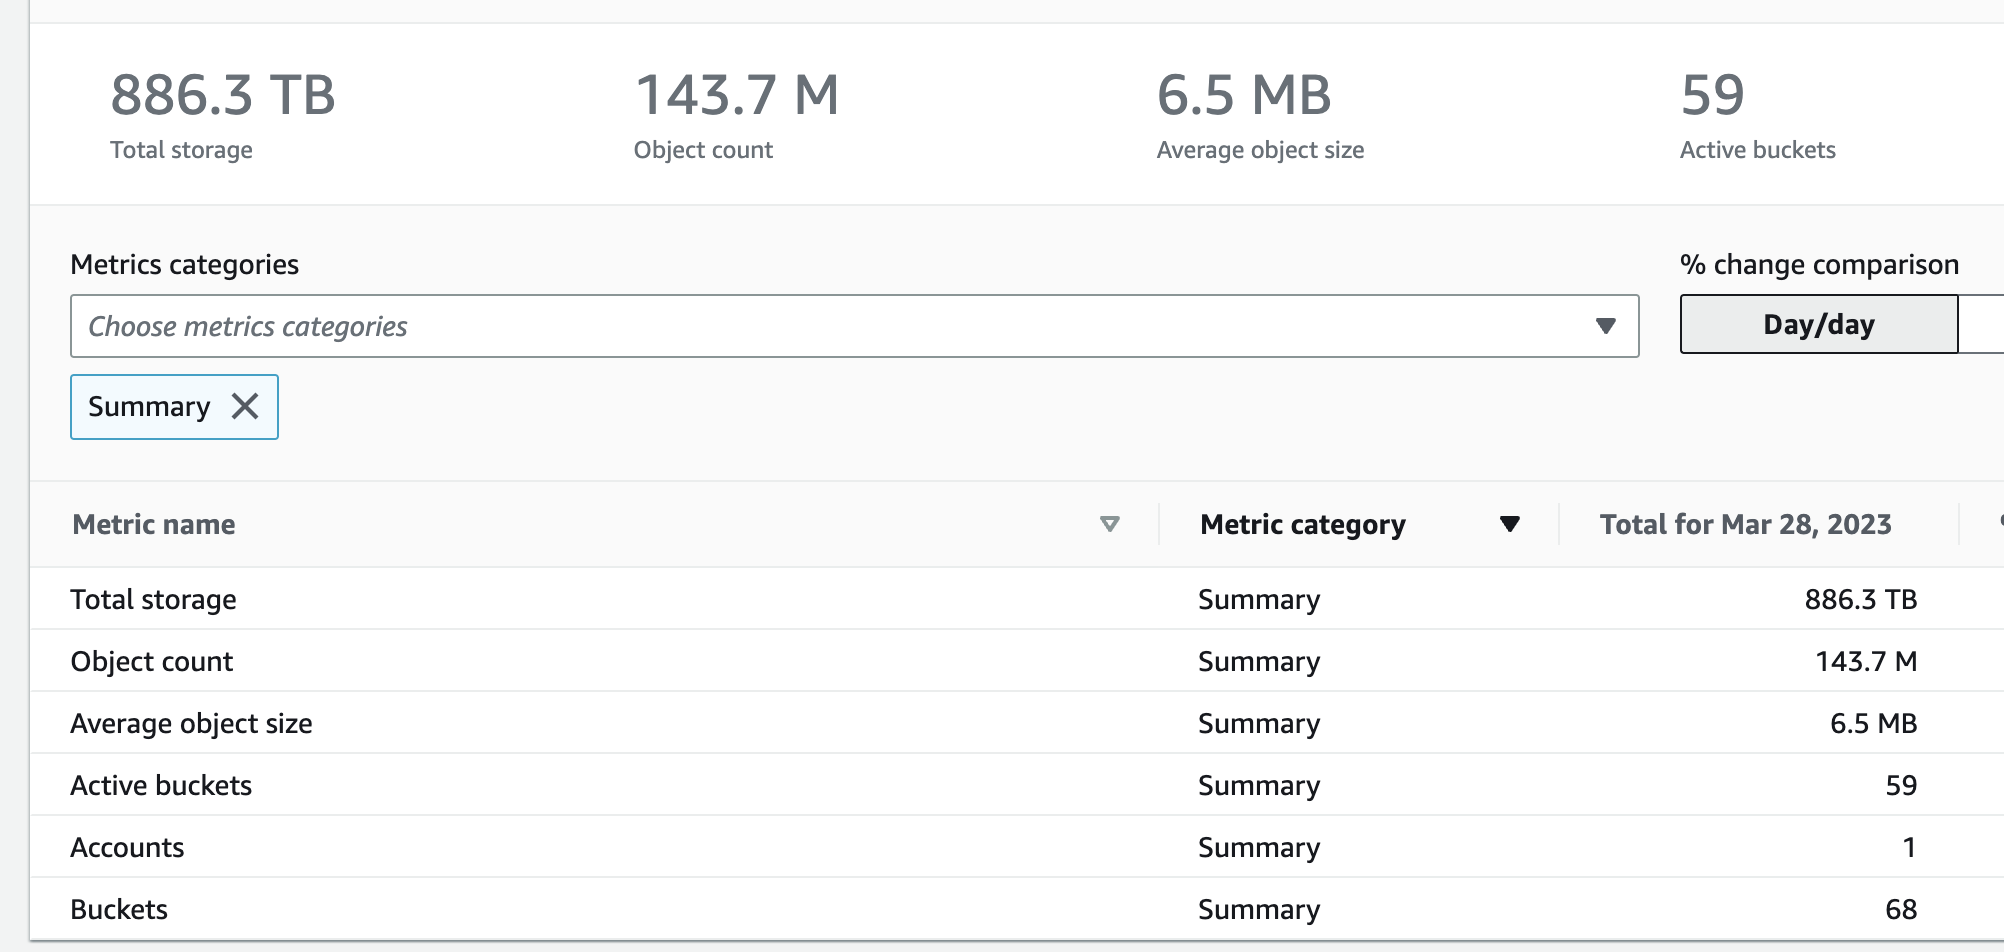
Once your dashboard is set-up, we can see the storage metrics across your account (all buckets and regions).
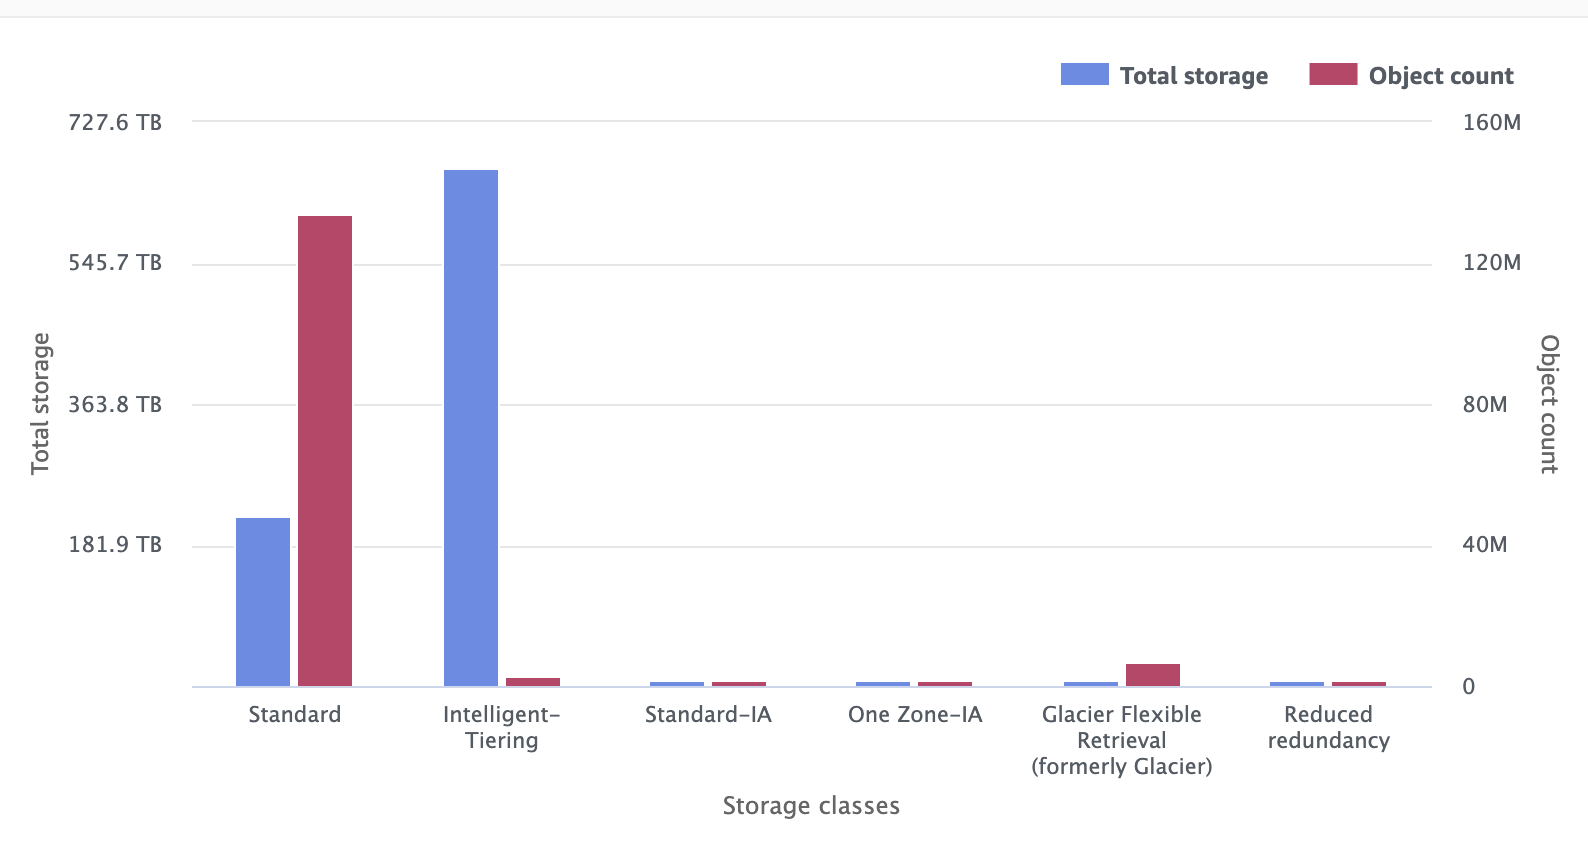
You can also see the storage class distribution and see what policies you can put in to transition the objects from the standard tier to other storage classes to reduce cost.
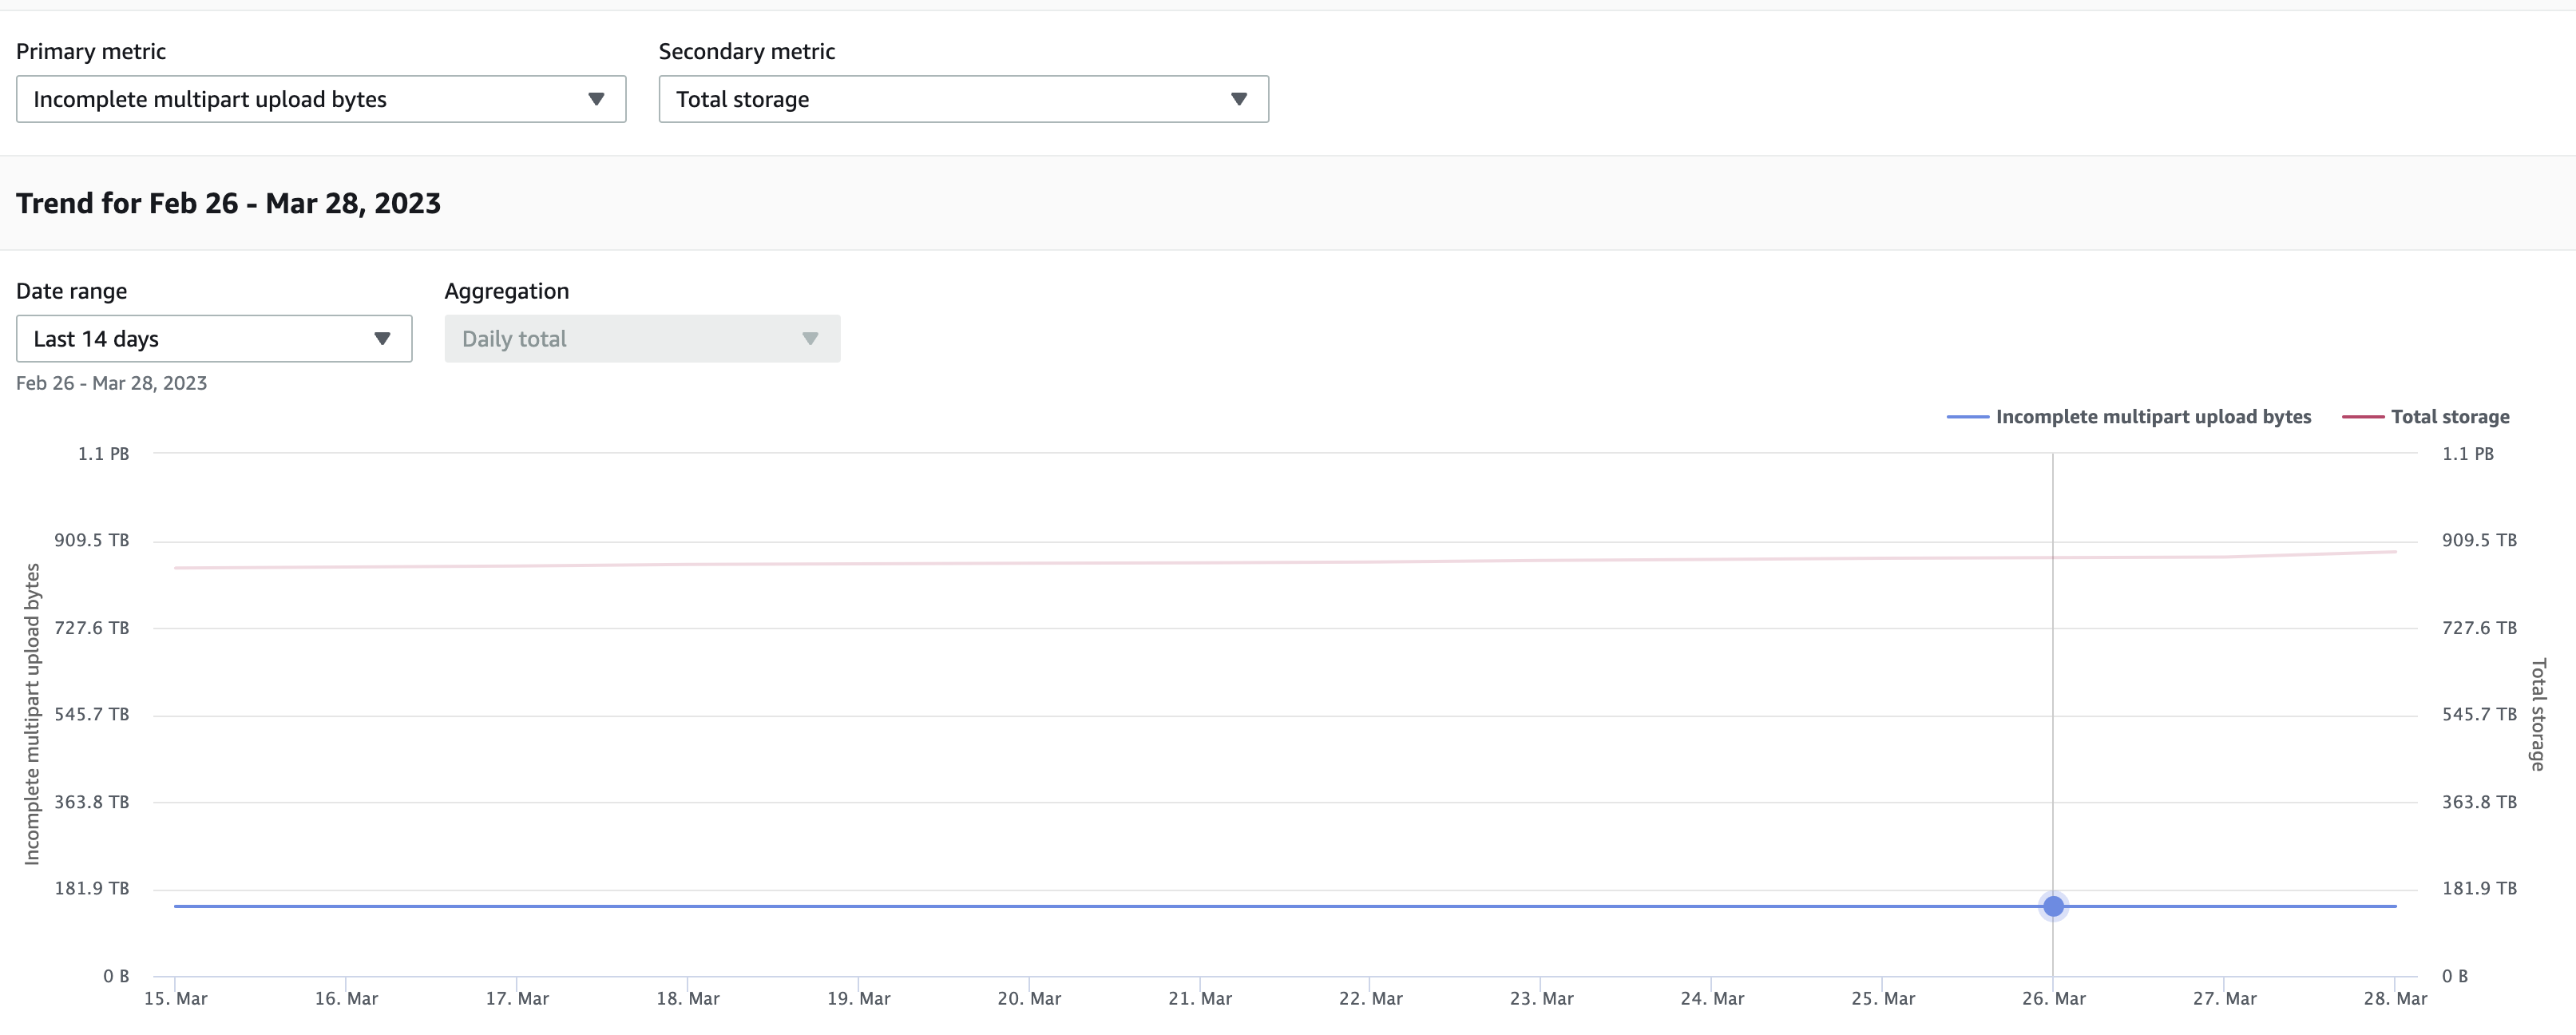
One of the advantages of using Storage Lens is that you can use the various free and advanced metrics, to understand your storage patterns and identify any anamolies.
For example, when you drill down on Incomplete multipart upload bytes metrics, we notice that there is around 181 TB of data in the bucket which is part of incomplete multipart uploads that could be cleaned up with a lifecycle rule.
Likewise, when we change the metrics to Object storage and change the timeline to 12 months, we notice that the storage growth was linear till Nov after which there is a sharp spike to 2.5 PB of storage. When you correspond this data to cost explorer we see that the costs had jumped from $8k to $40k per month.
You can then investigate the reason behind this data storage surge and take appropriate next steps such as cleaning up on the data or setting lifecycle rules that move this data from Standard access tier to other lower cost access tiers.

S3 Intelligent Tiering
When you have many buckets being shared across teams/projects, as a platform team it will be difficult to come up with lifecycle policies because you will have to interact with various teams for understanding the data access patterns. Sometimes, depending on what stage the project is, even the teams themselves may not have answers for the access patterns.
S3 Intelligent Tiering gives you a hand by doing it’s magic where for a small fee it will understand the access patterns and take the decisions for you by moving the objects across the different tiers thereby reducing your storage cost with little to no impact depending on your rules.
Below is a summary of access tiers supported by S3 Intelligent Tiering, transition rules, performance, impacts of enabling them and projected cost savings.
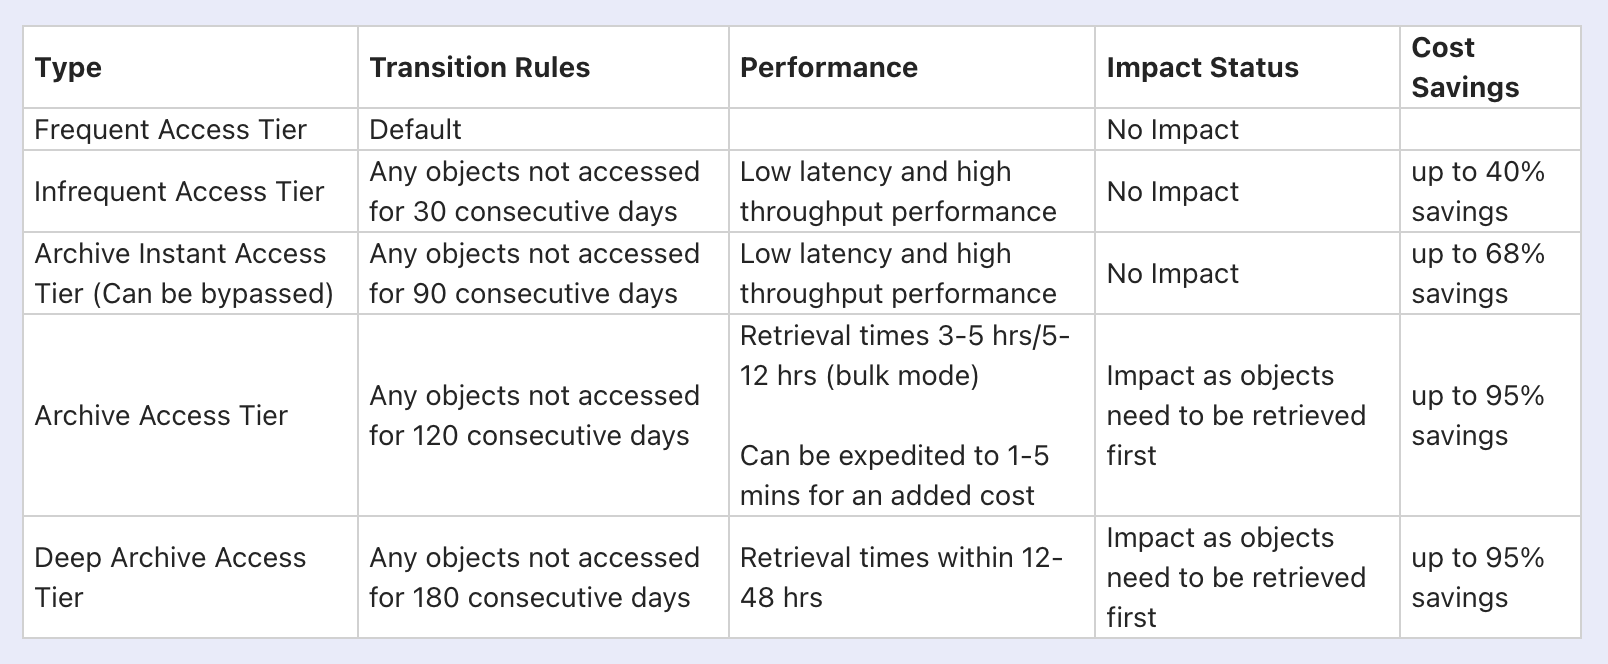
Transitions up to Archive Instant Access tier is automatic while the archive options need to be enabled explicitly in Intelligent Tiering.
So, based on the above table, the first thing you can do with zero impact is by adding a lifecycle rule to enable objects to be moved to intelligent tiering so that they are automatically transitioned to lower access tiers that reduce your cost while giving the same low latency/high throughput performance.
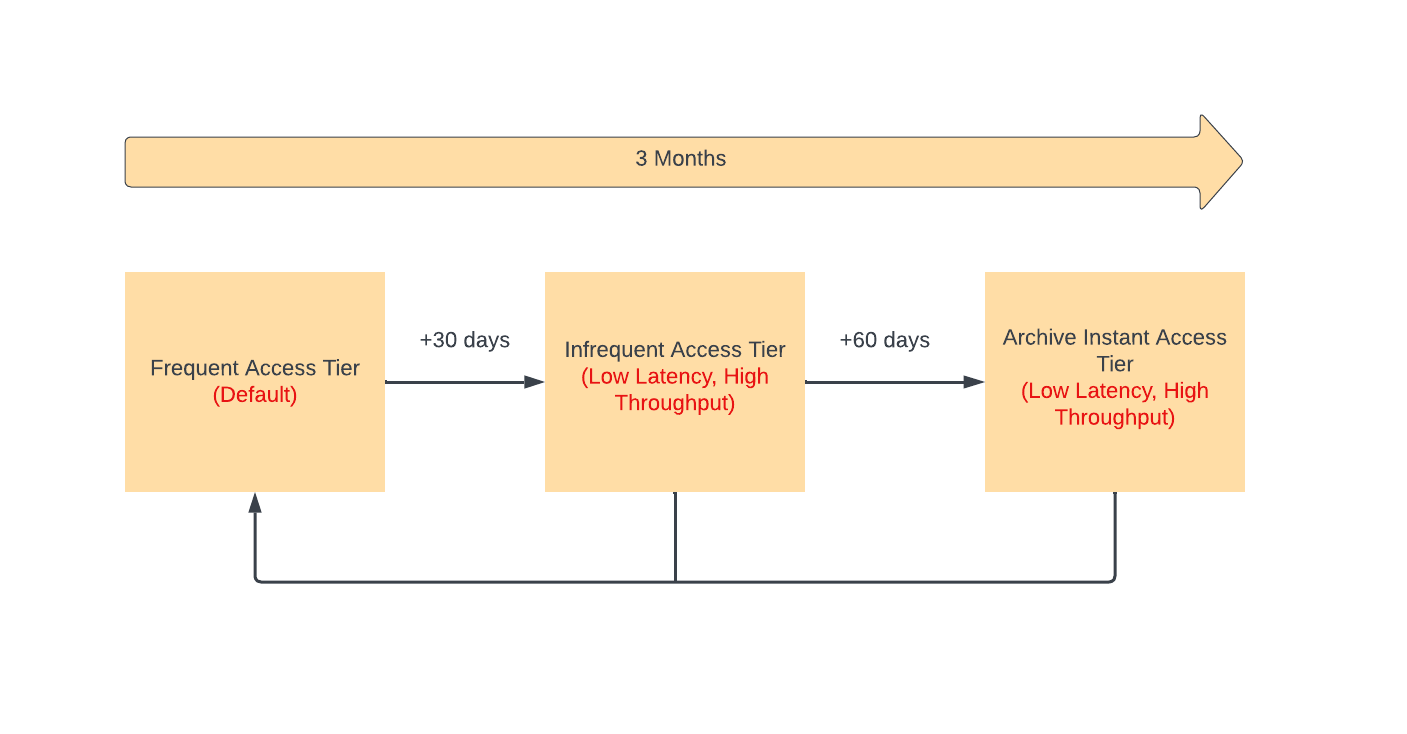
As shown above, all objects are in frequent access tier by default. Any objects not accessed for 30 consecutive days are automatically transitioned to Infrequent access tier.
Likewise, if they continue to remain not accessed for 90 consecutive days, they are transitioned to Archive Instant Access tier.
All of these access tiers provide the same low latency and high throughput but the lower access tiers save you costs when the objects aren’t frequently accessed. Also, Intelligent Tiering automatically moves the objects to Frequent Access Tier if it becomes accessed more often after it moved to other access tiers.
Objects last accessed date is determined as follows - Downloading or copying an object through AWS management console or running GetObject or CopyObject operations will initiate an access
Caveats:
- Objects which are less than 128 KB in size are not monitored and aren’t eligible for intelligent tiering
Lifecycle Rules
To enable this for your bucket, follow below steps:
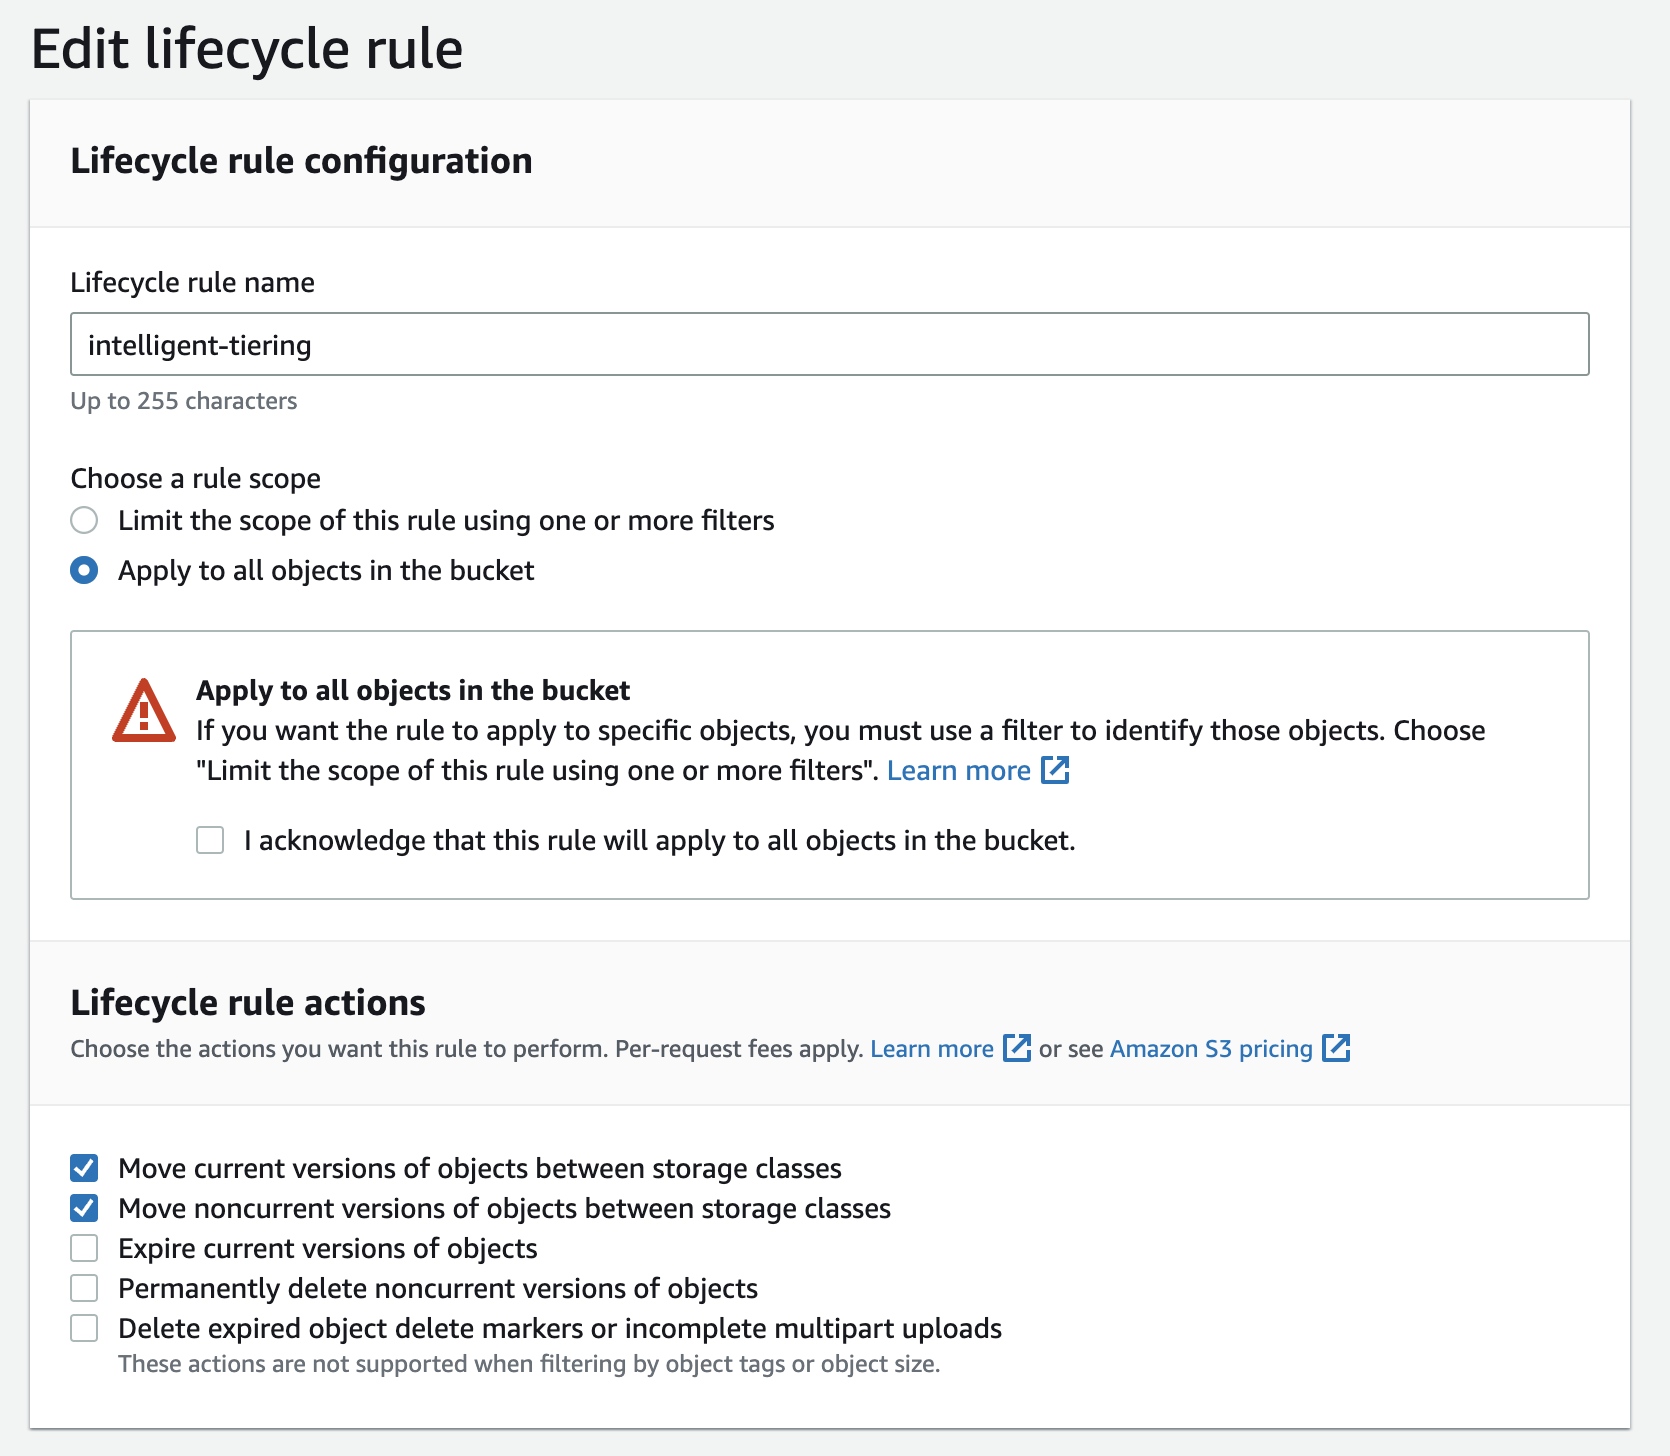
- Create a new lifecycle rule, and enable that for all objects in your bucket. Also, for actions enable “Moving objects between storage classes” for both current and noncurrent versions.
-
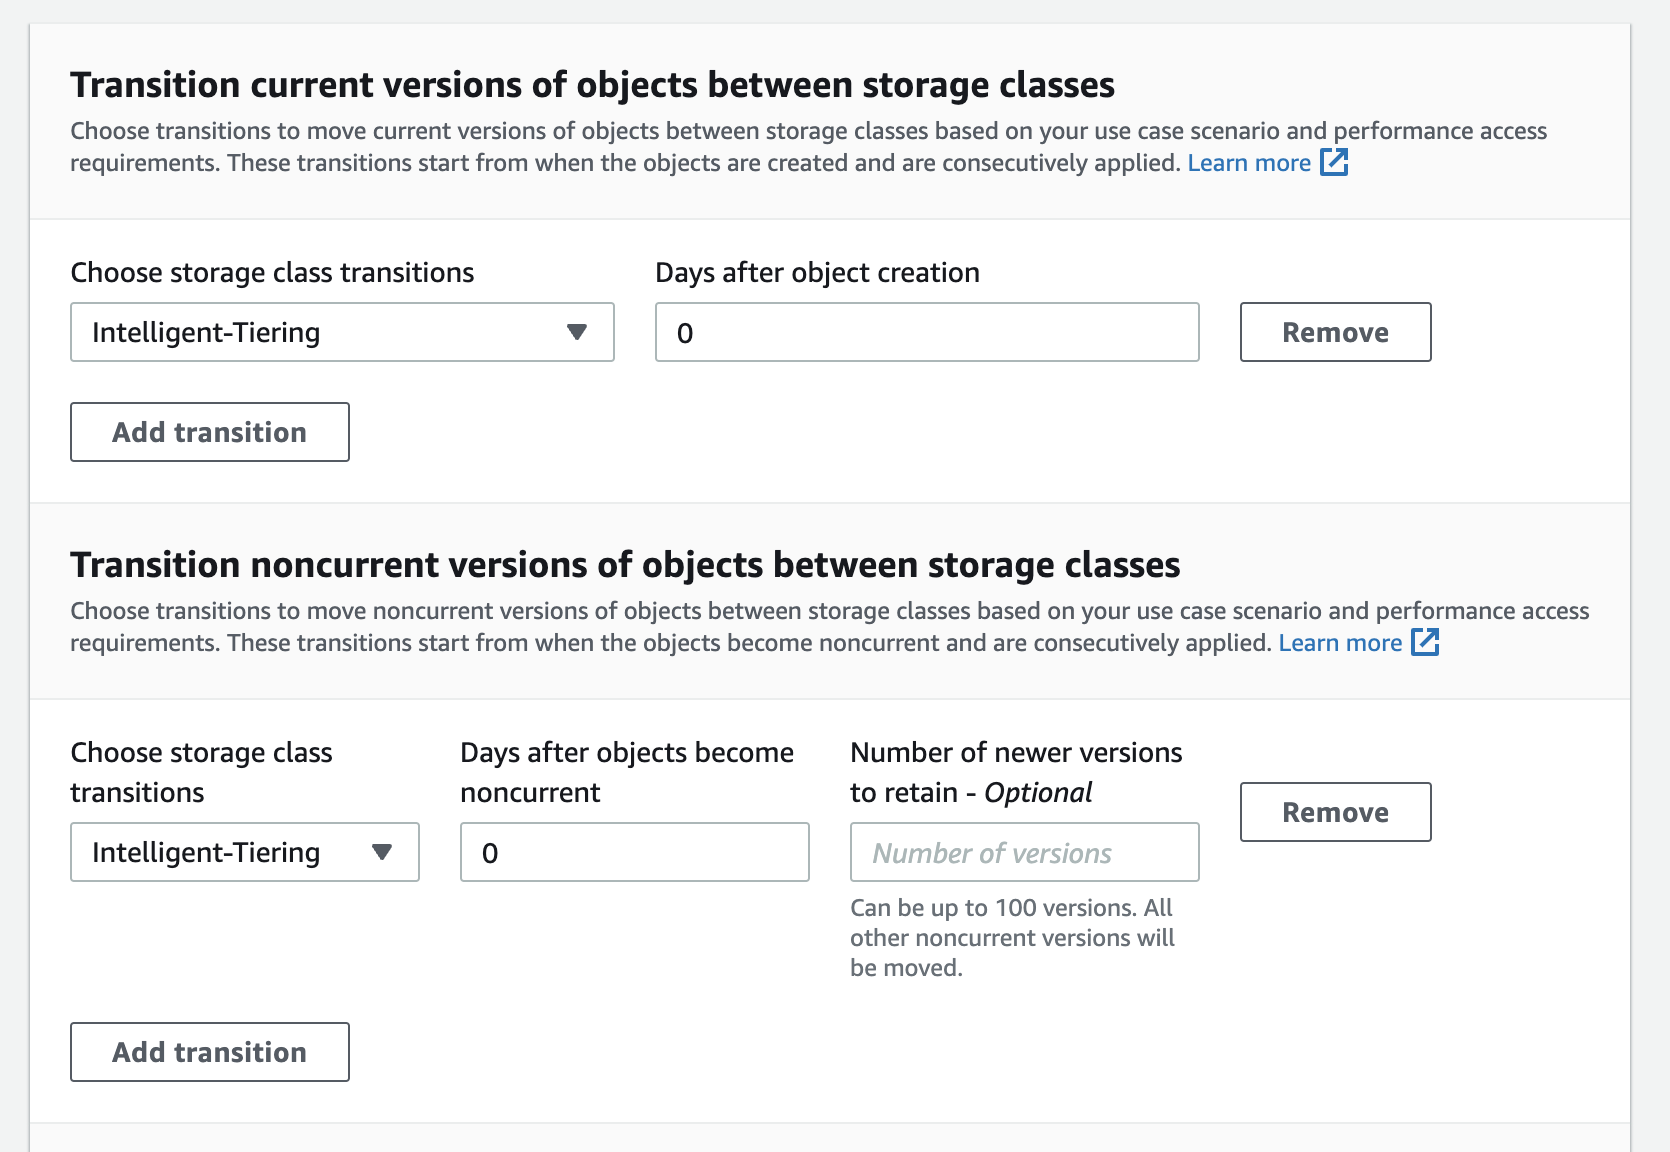
Set transition to ‘Intelligent-Tiering’ for both current and non-current object versions. We would like to leverage intelligent tiering as a defacto option, so you set the “Days after object creation” to 0 so that they are moved faster to Intelligent Tiering class.
-
Same for non-current object versions as well and we want all non-cuurent versions including latest to be managed by Intelligent Tiering so we don’t set any values for “Number of newer versions to retain” option.
This is how your lifecycle rule will look like -
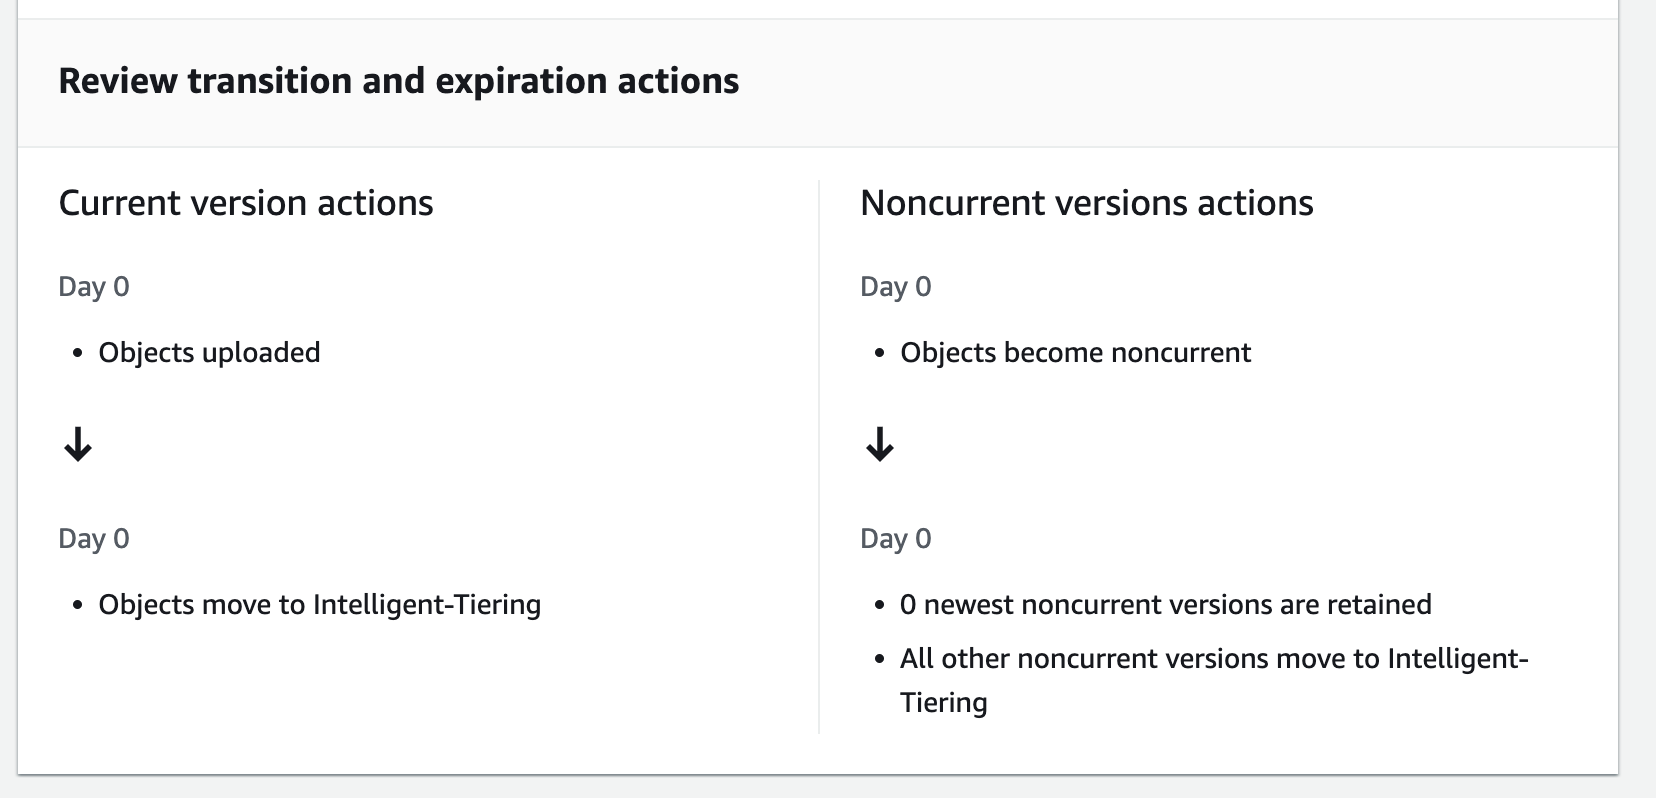
After applying above lifecycle rule, your objects are managed by intelligent tiering and you start to reap the benefits by not paying the same price for objects sitting idle in your bucket.
Archival Configurations
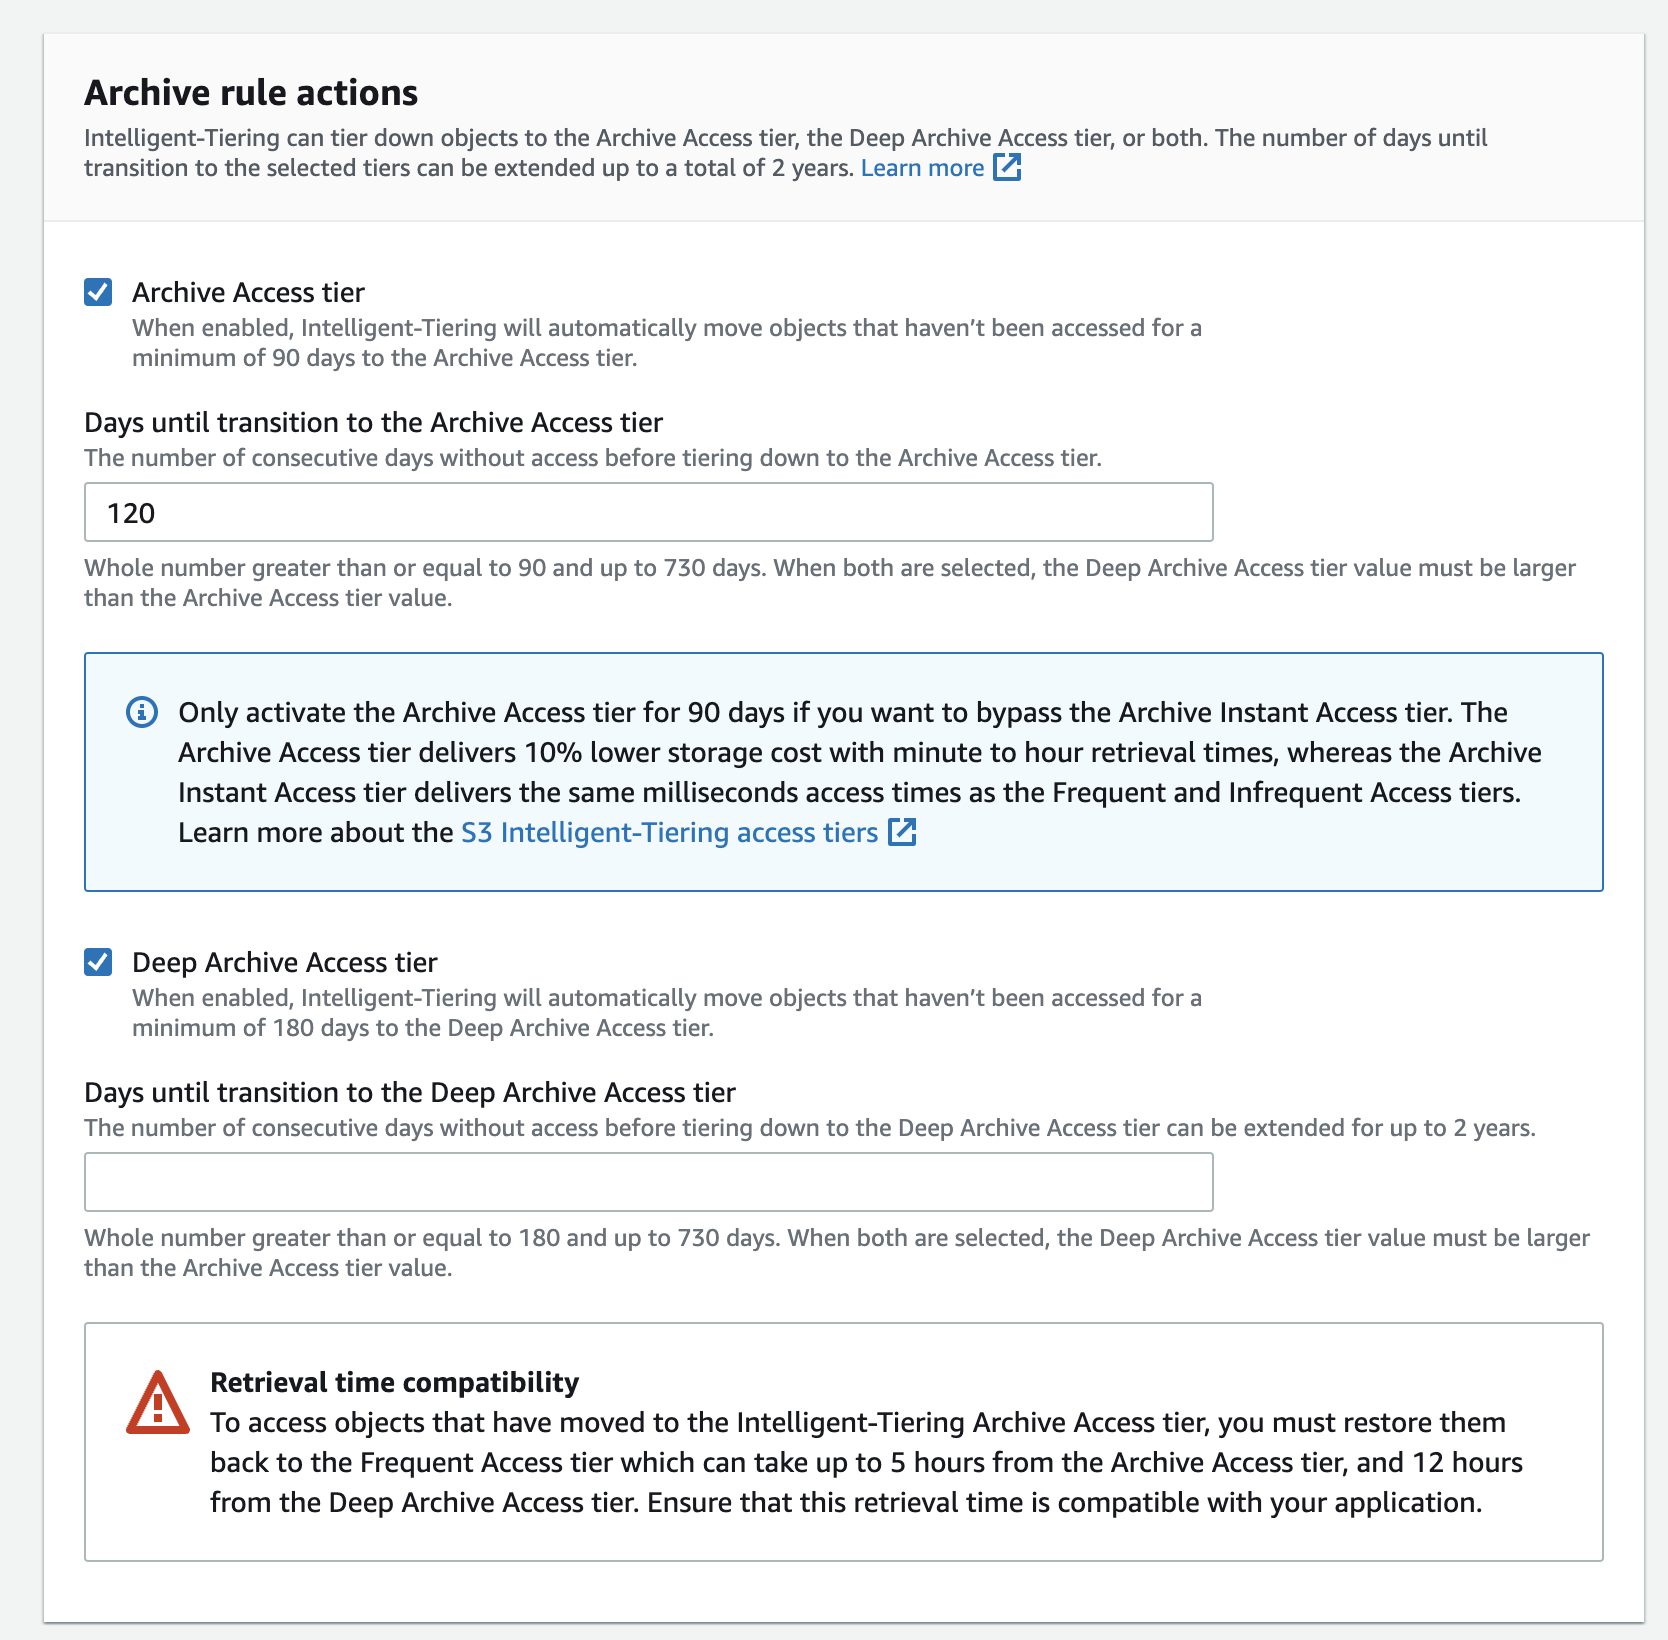
Next, you can further save costs by enabling archive options but check with your stakeholders before enabling them as these may cause workload impacts.

You enable these in the bucket properties under ‘Intelligent-Tiering Archive configurations’. Note that this only applies to objects in Intelligent Tier storage class.
So, you need to first move objects to Intelligent Storage class for archival options to apply. This may be confusing for newbies as the settings are split between lifecycle rules and intelligent tiering configurations.
Storage Class Metrics
Once you have applied the Intelligent Tiering rules, you might want to monitor how these objects are transitioned to the various storage classes in Intelligent Tiering so that you can get an idea of your object’s access patterns and cost savings you got by enabling this feature.
Set up CUDOS dashboard by following these steps - https://rharshad.com/aws-cost-optimizations-cost-intelligence-dashboards/
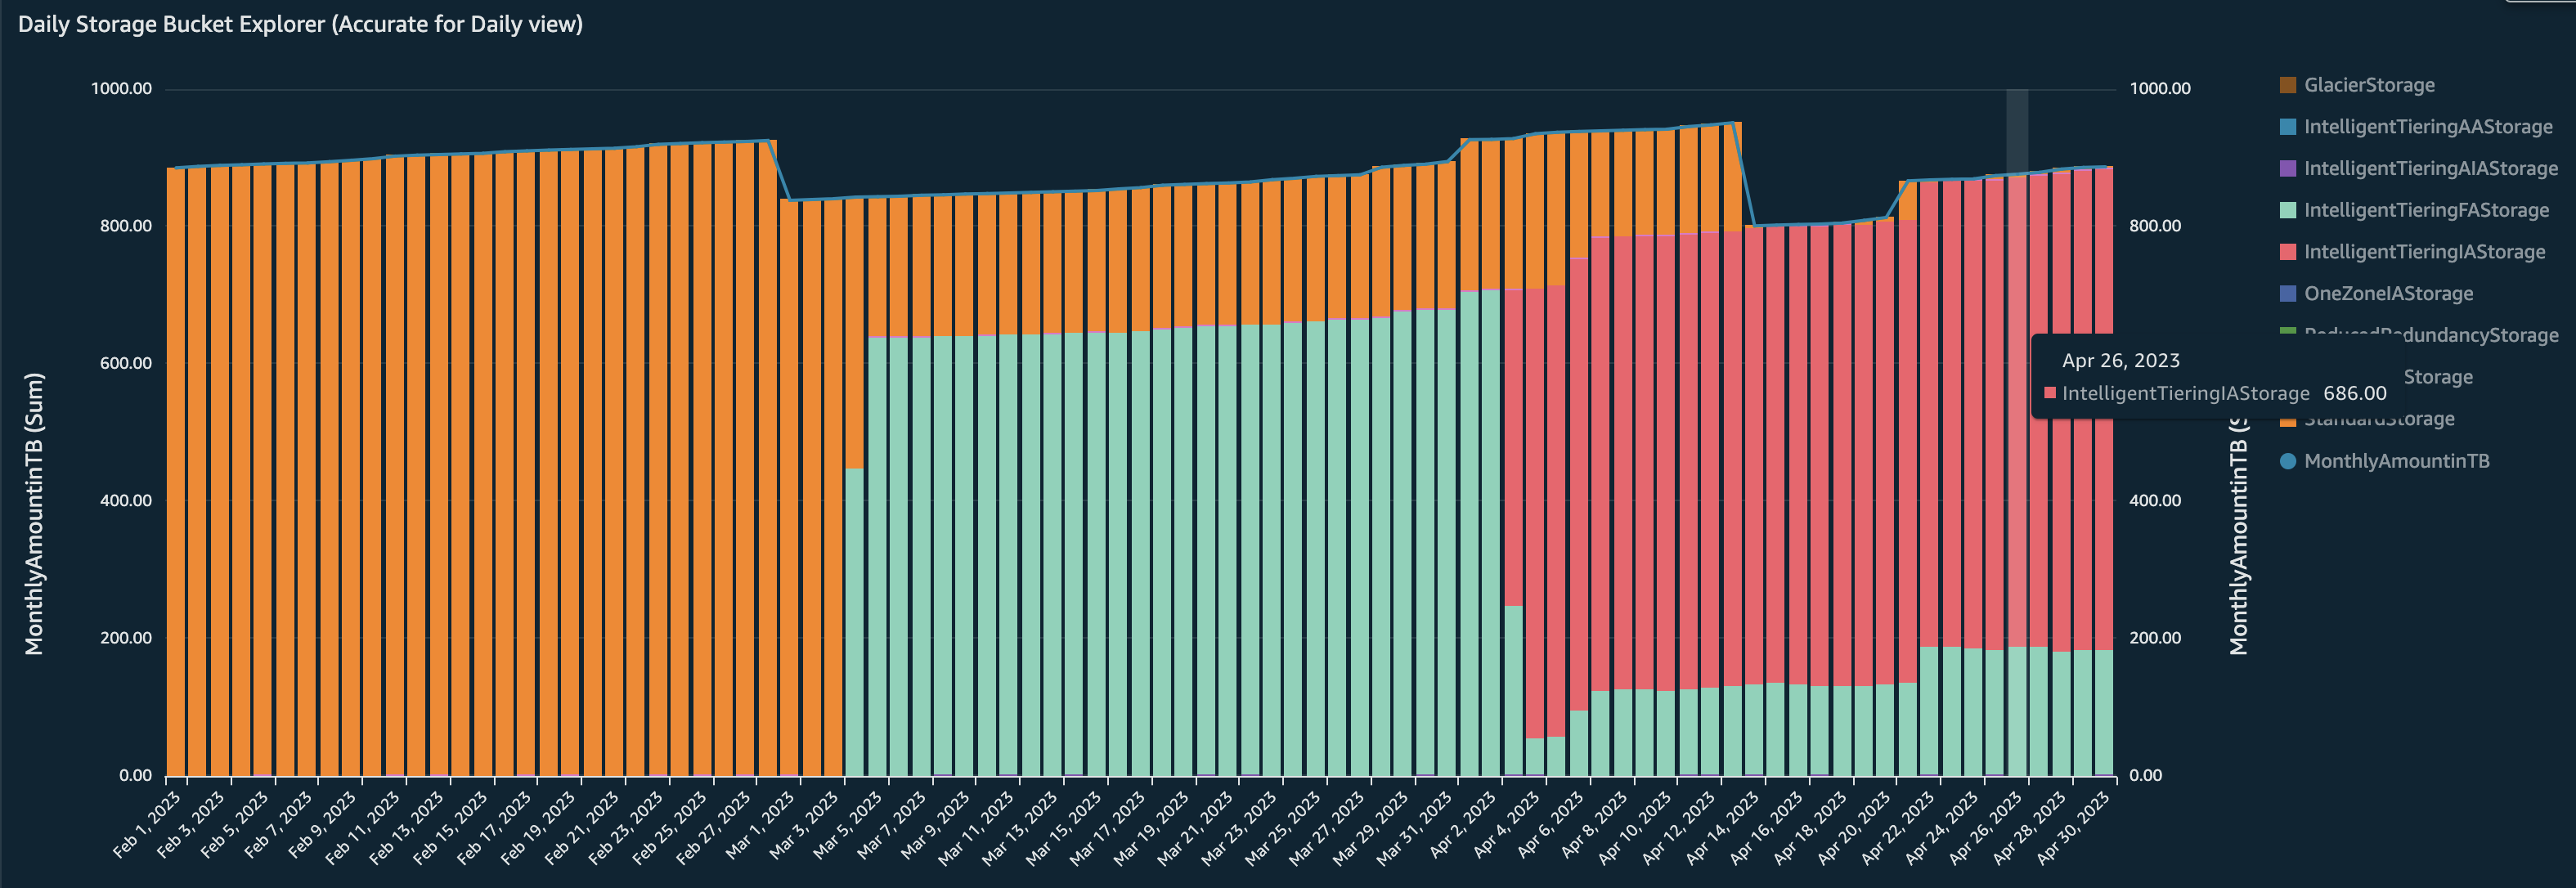
Once you have set it up, in the Amazon S3 tab you can view the graph for Daily Storage Bucket Explorer which shows the following trend:
-
Before we had enabled Intelligent Tiering, all our objects (900 TB) were in
Standard Storageclass -
Once we enabled Intelligent Tiering lifecycle policies, we can see the objects being transitioned to
Intelligent Tiering Frequent Accessstorage class -
After 30 days, we can see that the objects which were not accessed for the past 30 days (686 TB of 900 TB) being transitioned to
Intelligent Tiering Infrequent Access Tierstorage class which gives us up to 40% in savings.
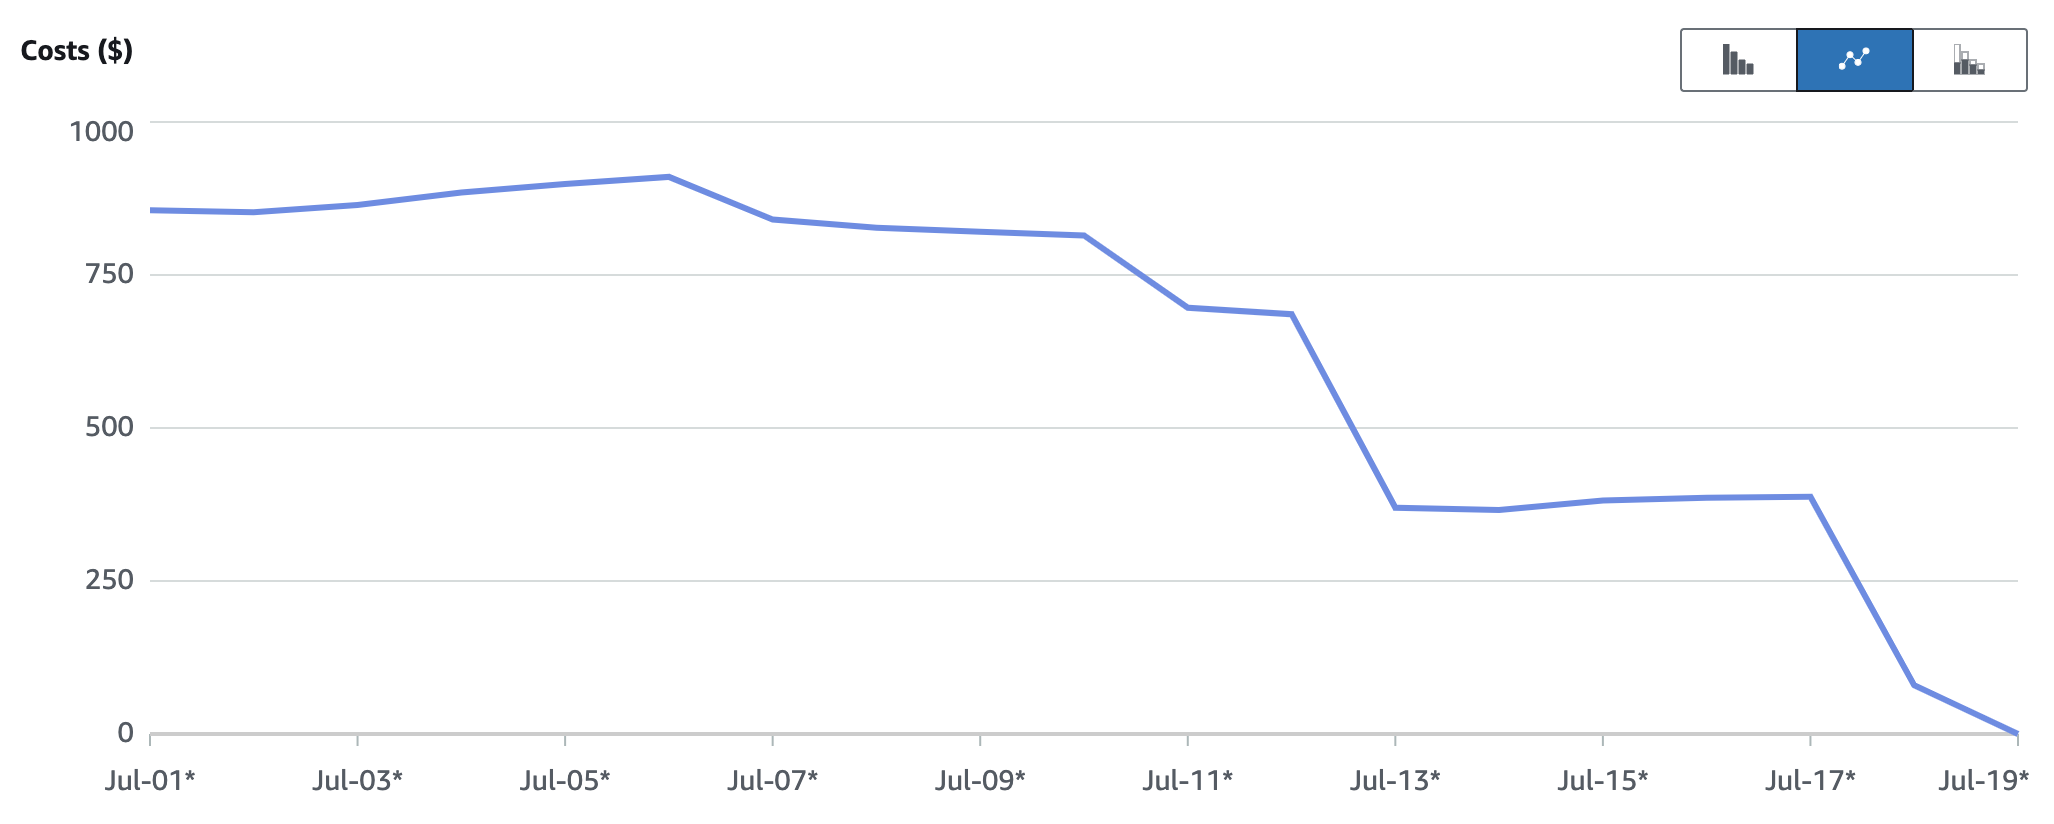
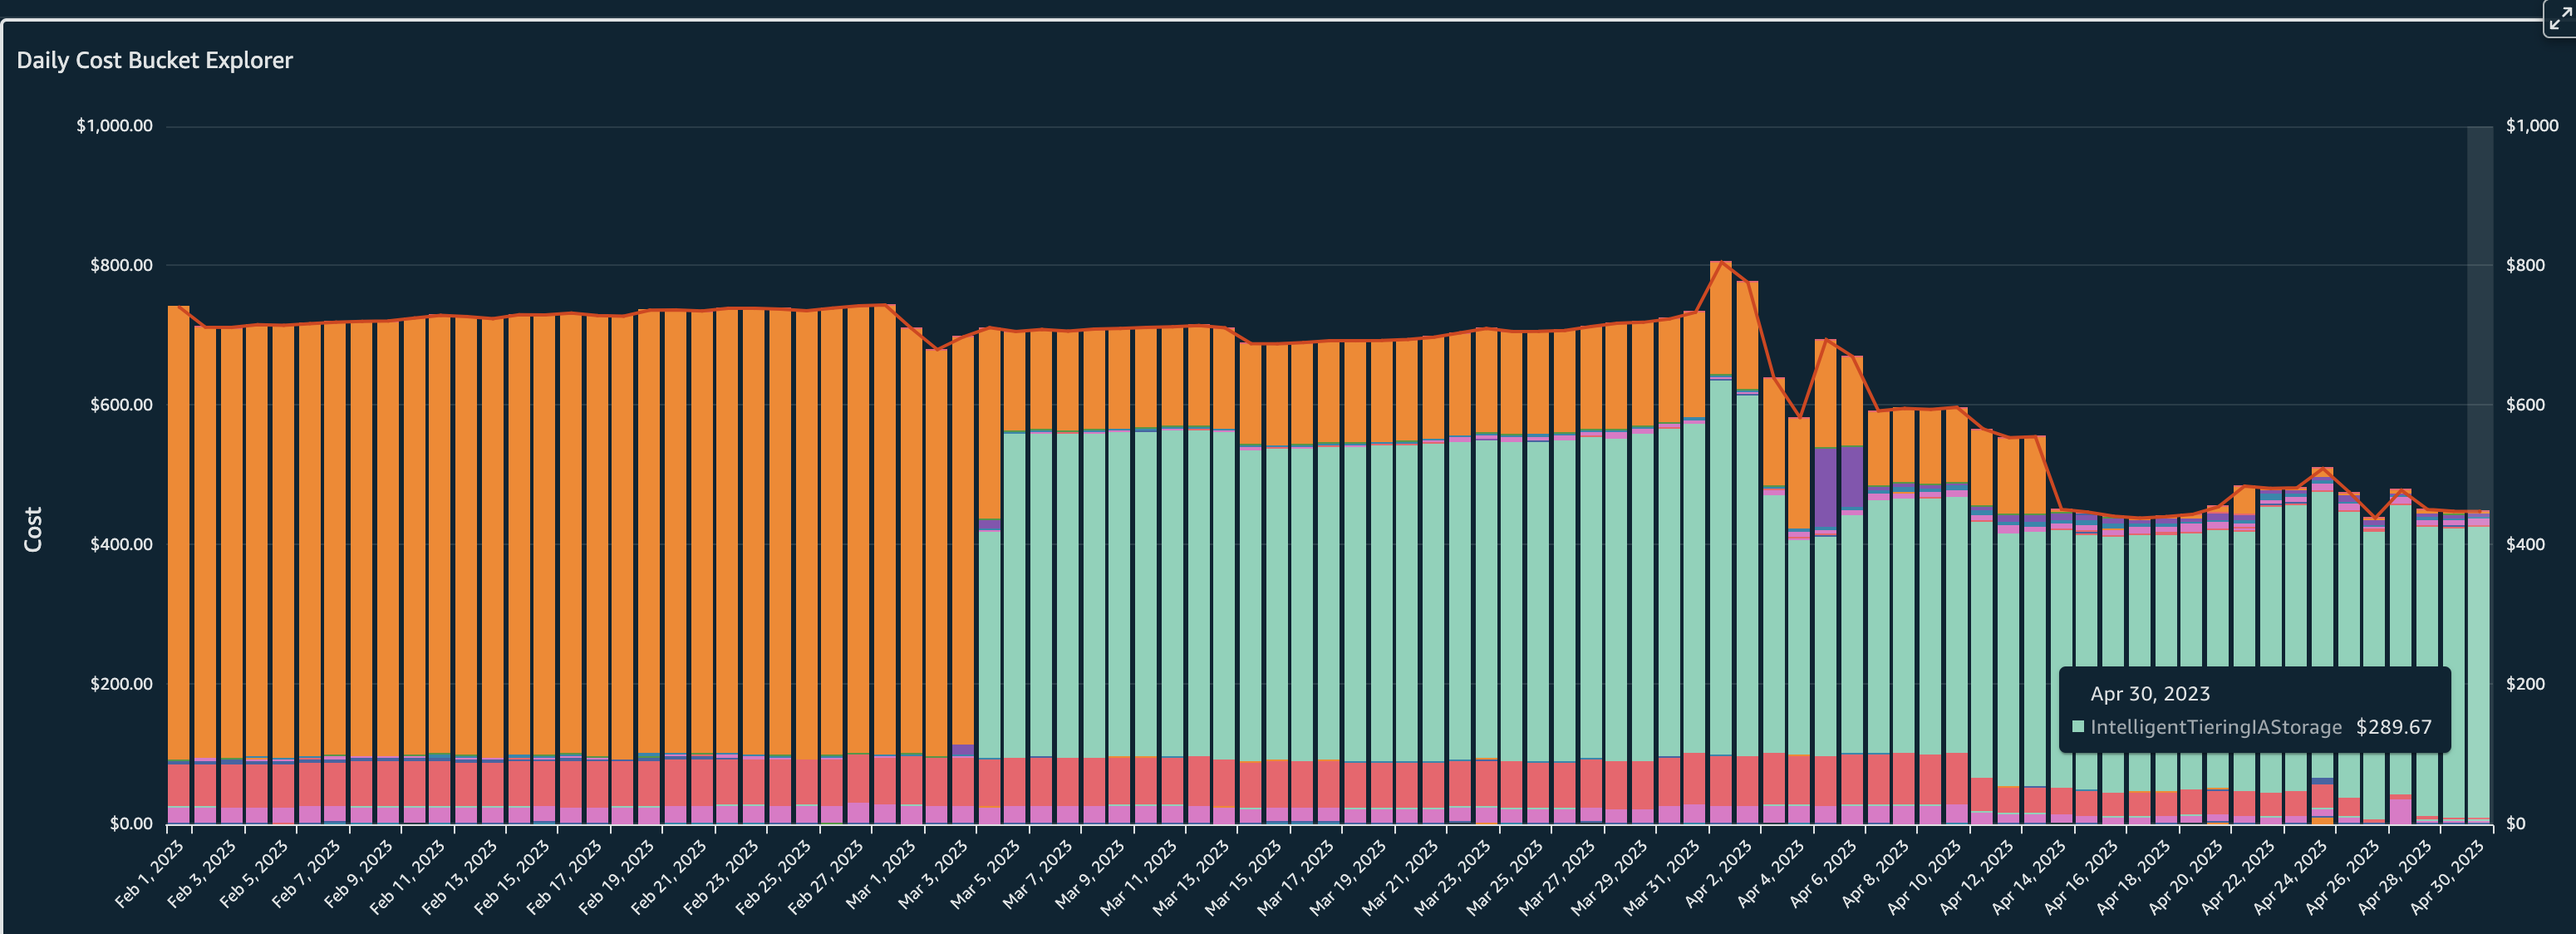
Also, in the Daily Cost Bucket Explorer graph we can see the costs dropping from $750 per day average to $440 per day largely influenced by storage of objects in Infrequent access.
Delete Incomplete Multipart Uploads
For large object uploads, multipart upload feature is more efficient providing higher throughout and quicker recovery for network issues.
However, if the multipart upload process is not completed fully, the uploaded bytes still remain in your S3 storage incurring costs.
These leftover bytes will start piling up and add to costs depending on the processes e.g. EMR jobs is one scenario where Multipart uploads can be left incomplete because of job failures.
So, set a lifecycle policy to clean up on those incomplete multipart uploads.
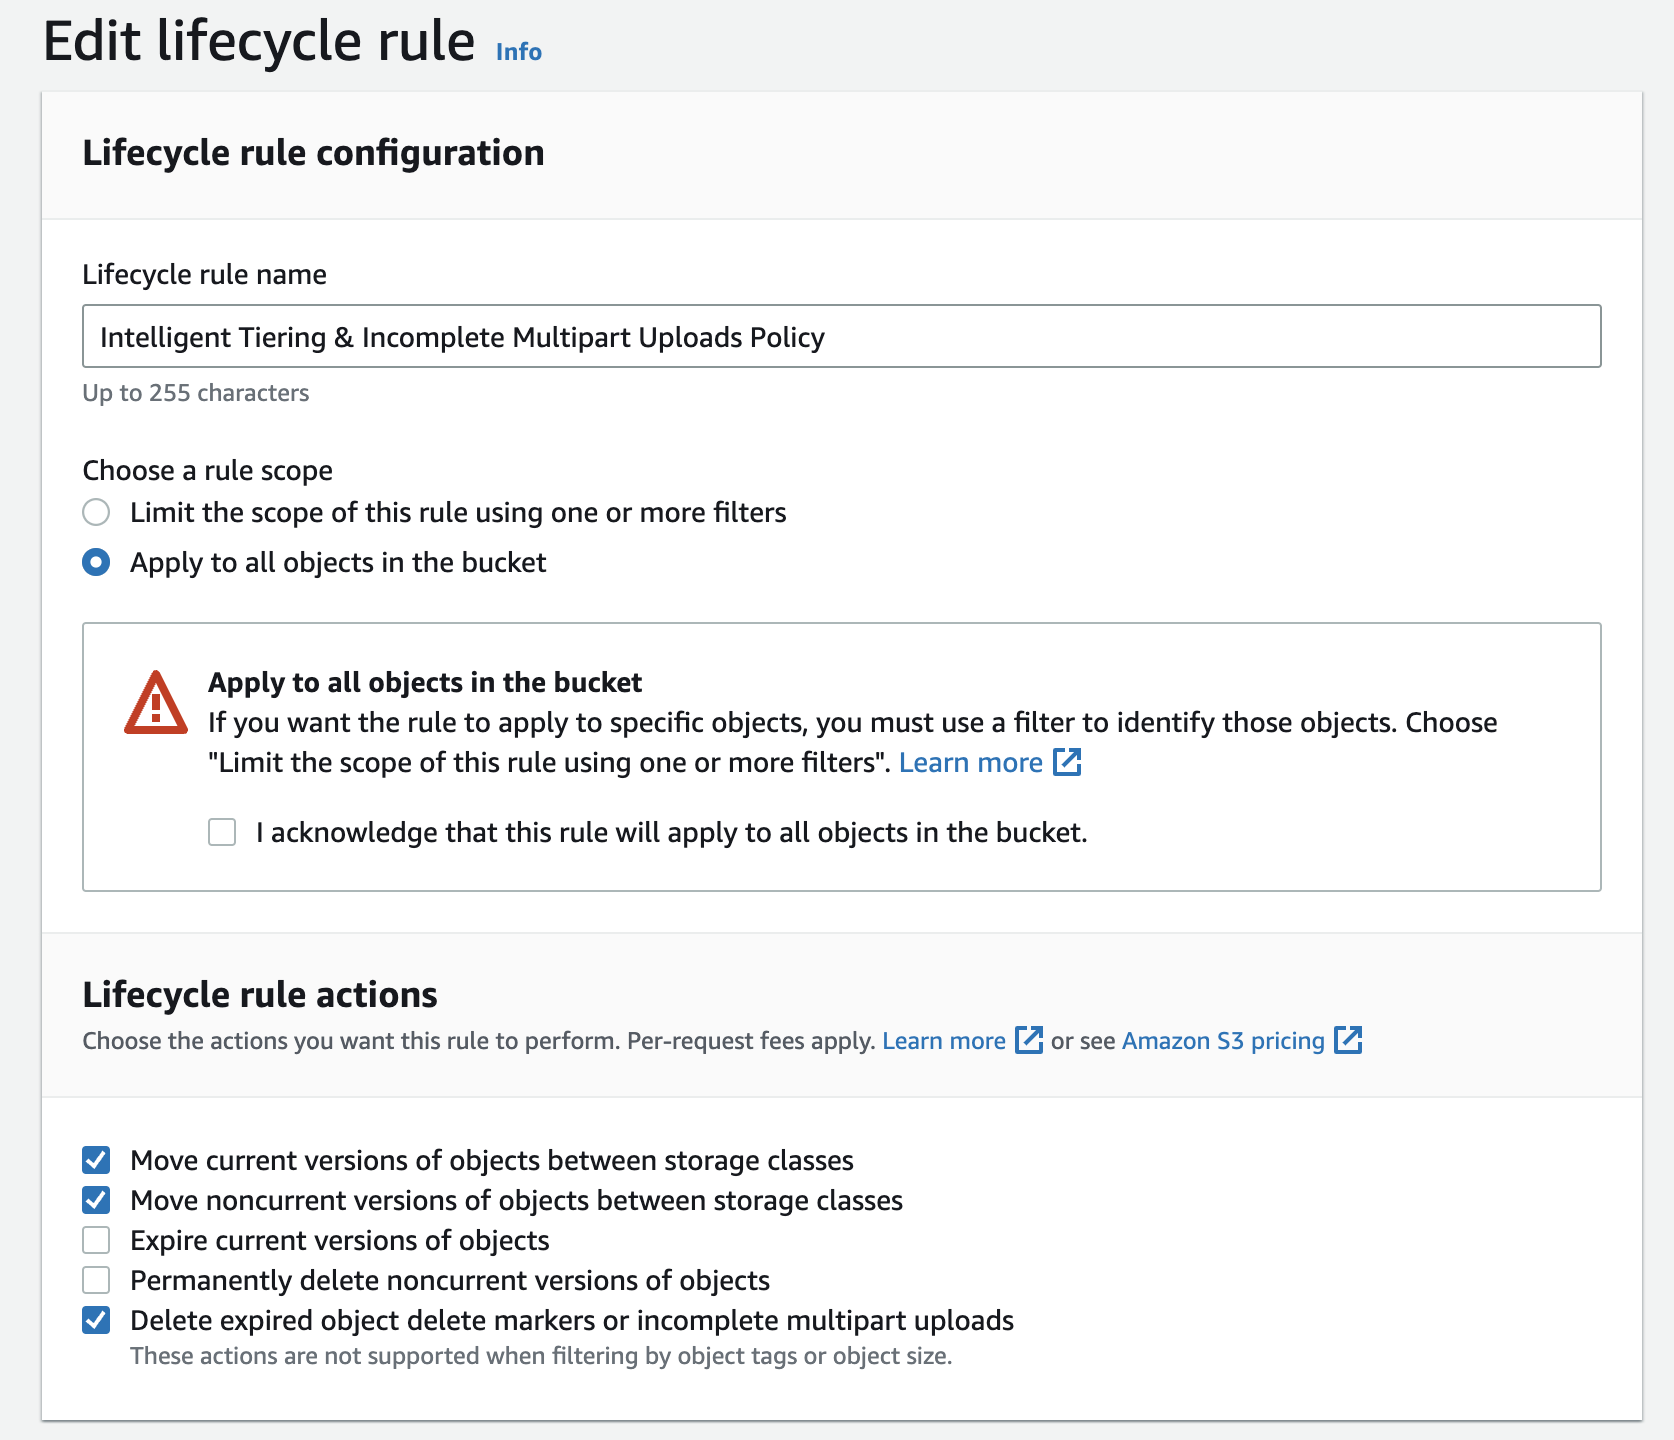
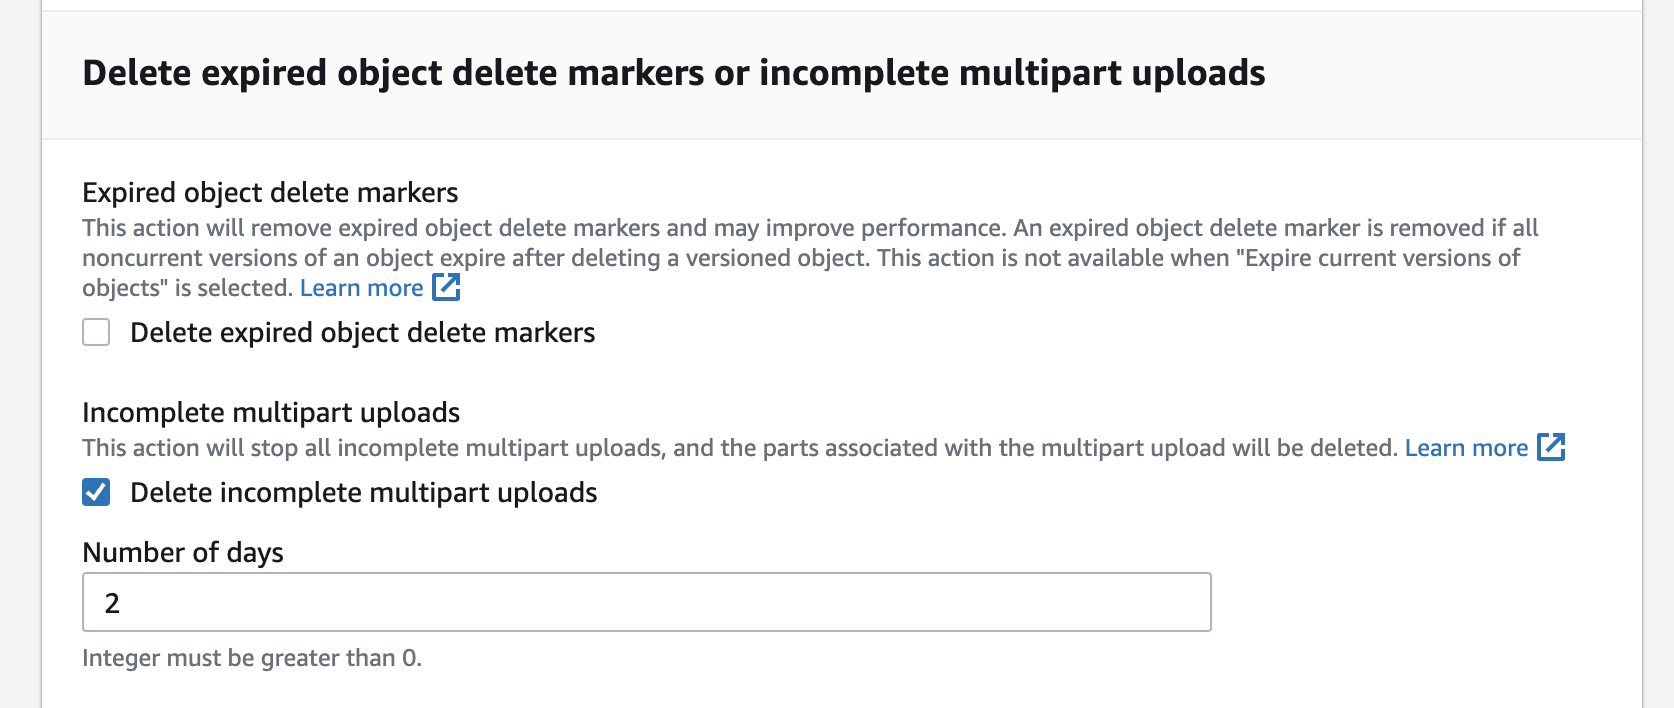
In above, we enable the option Delete expired object delete markers or incomplete multipart uploads which will give you the action options where you can configure the days after which the incomplete multipart upload bytes can be cleaned up from the buckets.
As you can see in below image, you can set the number of days after which the cleanup happens e.g. 2 days giving ample time incase any of the long running processes complete the uploads with delays due to intermittent network issues.
Once you configured the lifecycle rule, you can see the policy rule described in the rule overview section.

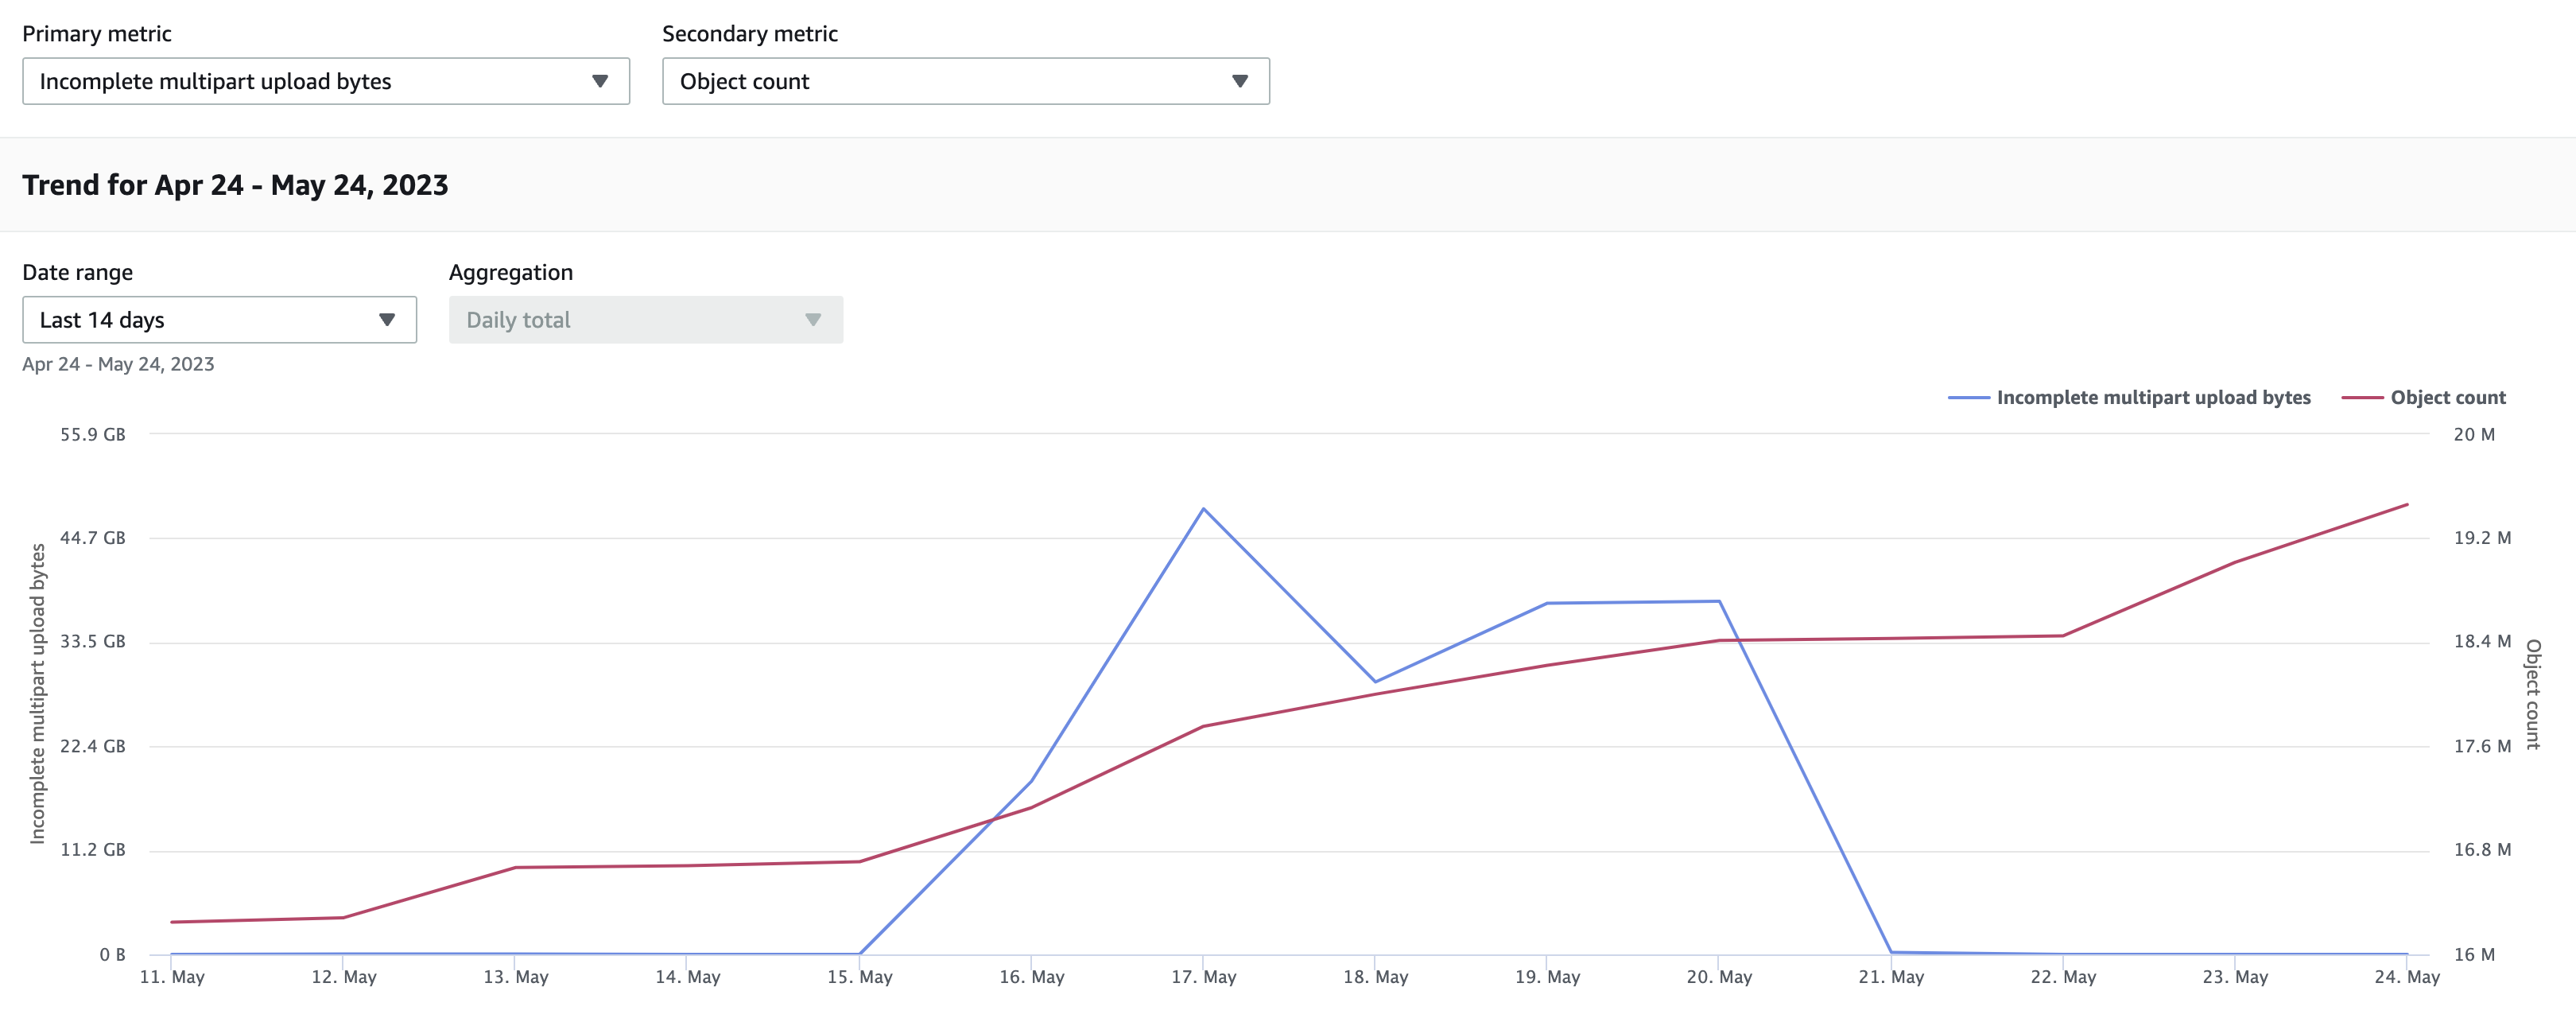
In the Storage Lens dashboards, from the metrics we can see that the incomplete upload bytes going up to 44 GB and then getting cleaned up eventually by the lifecycle rules resulting in 0 bytes.
Delete/Reduce NonCurrent Versions Retained
If you have buckets which are versioned, you will quickly accumulate costs as the number of previous versions of objects grow.
For example, if your teams are running EMR jobs and writing to versioned buckets those jobs might overwrite files on multiple re-runs depending on configuration causing an explosion of previous version of files.
So, it’s always recommended to have a lifecycle policy in place to clean up non-current versions of objects.
There are two options available -
[1] If your use case needs to maintain non-current versions for the long-term for any recovery/compliance/audit purposes then determine how many versions of noncurrent objects you would like to maintain. e.g. If you need only up to 1 previous version to be maintained then you can configure a lifecycle policy to clean up rest of the older previous versions.
[2] If your use case needs to maintain non-current versions only for a few days to support accidental deletions then configure a policy to expire all non-current versions after ‘x’ days.
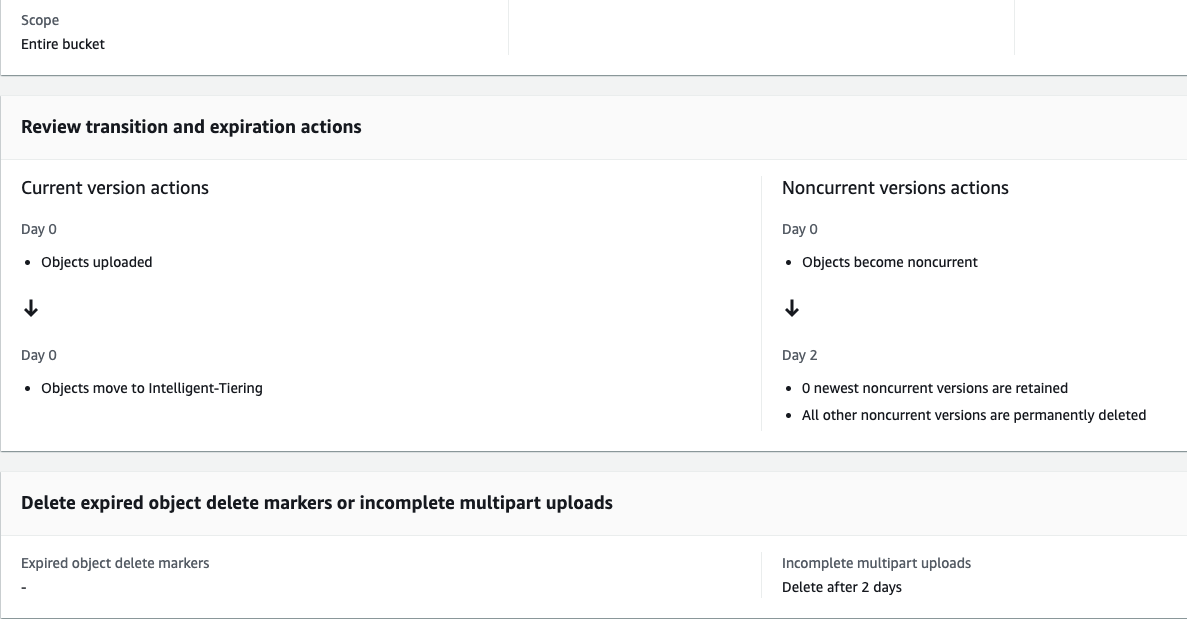
You set up a lifecycle rule like shown below where we say not to retain any non-current versions post 2 days and to permanently delete all of the non-current versions post 2 days.
Once the lifecycle policy gets applied, using Storage lens we can observe the % noncurrent version bytes metric trend showing a 47.83% drop meaning we had so much data accumulated from non-current versions of objects costing us $$.

In storage lens, if you plot the data using the metrics, we can see the storage dropping from 1.8 PB all the way down to 900 TB (blue line) and from the red line we can see the drop co-relates to the clean up of Noncurrent version bytes.

From cost explorer, we can see our actions led to a cost drop from $900 per day to $380 per day for closer to PB of data residing in S3. If you calculate this cost for 12 months, you notice that you got significant savings by just enabling a lifecycle policy and taking meaningful actions on the data.
S3 costs are cheap but bad data management means your costs will keep on increasing and by the time it comes to your attention you would have already paid the bills to AWS.
